
Operation Manual


4.4 Betrieb mit einem Computer
Über jeden der zwei USB-Anschlüsse können digitale
Au diosignale in beide Richtungen zwischen Mischpult
und Computer übertragen werden, auch gleichzeitig:
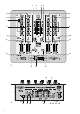
A Buchse USB 1 (24)
Verwendung als Eingang:
Über USB 1 eingespeiste Audiosignale kön-
nen über Kanal 2 wiedergegeben werden.
Verwendung als Ausgang:
USB 1 gibt das Mastersignal aus [entspricht
dem Signal am Ausgang AMP (19)].
B Buchse USB 2 (25)
Verwendung als Eingang:
Über USB 2 eingespeiste Audiosignale kön-
nen über Kanal 3 wiedergegeben werden.
Verwendung als Ausgang:
USB 2 gibt das Ausgangssignal vor dem Mas -
terregler aus [entspricht dem Signal am Aus-
gang REC (20)].
Die USB-Buchsen lassen sich nur in Verbindung mit
einem Computer nutzen. Wiedergabegeräte oder
Speichermedien mit USB-Anschluss können nicht
direkt mit dem Mischpult verbunden werden.
1) Den Computer (z. B. mit dem Betriebssystem
Windows 98 SE, Windows 2000, Windows XP
oder
Windows Vista
) und das Misch pult ein-
schalten.
2) Den jeweiligen USB-Anschluss des Mischpults
über ein USB-Verbindungskabel (z. B. über das
als Zubehör erhältliche Kabel USB-203AB) mit
einem USB-Anschluss am Computer verbinden:
Der USB-An schluss des Mischpults wird als
ex ter nes USB-Gerät erkannt, je nach Betriebs -
system des Computers z. B. als „USB Audio“,
„USB Audiogerät“ oder „USB Audio CODEC“ [mit
dem Zusatz „(2)“, wenn der Anschluss als zwei-
tes USB-Gerät installiert wurde]. Die erforder -
lichen Treiber (Standardtreiber des Betriebs sys -
tems) werden automatisch installiert.
Hinweis: Sind nicht alle geforderten Treiber auf
dem Computer vorhanden, muss wäh -
rend des Installationsvorgangs die
Betriebssystem-Original-CD eingelegt
oder eine Internetverbindung herge-
stellt werden, um die Treiber nachzu -
installieren. Gegebenenfalls nach der
Installation den Computer neu starten.
3) Die verwendete Abspiel-/Aufnahmesoftware auf-
rufen und dort die erforderlichen Einstellungen
für die Tonwiedergabe über das Mischpult
bzw. Tonaufnahme vom Mischpult vornehmen
(→ An lei tung der Software). Das Mischpult kann
dann an hand Kapitel 5 bedient werden.
Falls kein Ton zu hören ist, folgende Einstellungen
des Computer-Betriebssystems überprüfen:
– Toneingabe und -ausgabe müssen richtig zuge-
wiesen sein: Wird der jeweilige USB-Anschluss
des Mischpults als Eingang verwendet, muss er
als Wieder gabe ge rät angewählt sein, wird er als
Ausgang verwendet, muss er für die Tonaufnah -
me angewählt sein.
– Der Ton muss eingeschaltet sein.
– Die entsprechenden Lautstärkeregler dürfen nicht
auf Minimum eingestellt sein.
5 Bedienung
Erst den Masterregler (1) auf „0“ stellen, dann das
Mischpult mit dem Schalter POWER (2) einschalten.
Die Betriebsanzeige darüber leuchtet. Anschließend
die angeschlossenen Geräte einschalten.
Nach dem Betrieb das Mischpult wieder mit dem
Schalter POWER ausschalten. Wird es längere Zeit
nicht benutzt, das Steckernetz gerät aus der Steck-
dose ziehen, da es selbst bei aus ge schaltetem
Mischpult einen geringen Strom verbraucht.
5.1 Grundeinstellung der Eingangskanäle
Zu nächst alle Gain-Regler (6), Klangregler (8) und
den Crossfader (14) in die Mittelposition stellen.
Zum Einschalten des Mikrofons den Um schal ter
MIC (13) von der linken Position „OFF“ (Mi krofon
aus) in die mittlere Position „ON“ (LED über dem
Schalter leuchtet) kippen. Vorerst den Schalter PAD
(7) in die obere Position schieben.
Zum Aussteuern eines Kanals:
1) Mit dem Kippschalter (5) des Kanals den Ein-
gang anwählen, an dem die Tonquelle ange-
schlossen ist.
Bei den Kanälen 2 und 3 kann zwischen
drei Eingängen – PHONO, CD und USB 1 bzw.
USB 2 – umgeschaltet werden:
– Um den USB-Anschluss zu wählen, den Kipp-
schalter auf „USB 1“ bzw. „USB 2“ stellen.
– Um den Eingang PHONO zu wäh len, den
Kippschalter auf „PH/CD“ und den Schiebe-
schalter (16) des Kanals auf „PHONO“ stellen.
VORSICHT Stellen Sie die Lautstärke der Audio -
an lage und die Kopfhörerlautstärke
nie sehr hoch ein. Hohe Laut stärken
können auf Dauer das Gehör schädi-
gen! Das Ohr gewöhnt sich an große
Lautstärken und empfindet sie nach
ei niger Zeit als nicht mehr so hoch.
Darum eine hohe Laut stärke nach
der Gewöhnung nicht wei ter erhöhen.
4.4 Operation with a computer
Each of the two USB ports allows transmission of
digital audio signals in both directions between the
mixer and the computer, even at the same time.
A port USB 1 (24)
when used as an input:
Audio signals fed in via USB 1 can be repro -
duced via channel 2.
when used as an output:
USB 1 will provide the master signal [corre-
sponds to the signal at the output AMP (19)].
B port USB 2 (25)
when used as an input:
Audio signals fed in via USB 2 can be repro -
duced via channel 3.
when used as an output:
USB 2 will provide the output signal ahead of
the master control [corresponds to the signal
at the output REC (20)].
The USB ports can only be used in connection with
a computer. It will not be possible to directly connect
reproduction units or storage media with USB port to
the mixer.
1) Switch on the computer (e. g. with the operating
system
Windows 98 SE, Windows 2000, Win-
dows XP,
or
Windows Vista
) and the mixer.
2) Connect the corresponding USB port of the mixer
via a USB connection cable (e. g. via the cable
USB-203AB available as an accessory) to the
USB port on the computer:
The USB port of the mixer will be recognized
as an external USB unit; according to the oper -
ating system of the computer e. g. as “USB
Audio”, “USB Audio Device”, or “USB Audio
CODEC” [with the addition “(2)” if the port has
been in stalled as a second USB unit]. The drivers
re quired (standard drivers of the operating
system) will be installed automatically.
Note: If not all drivers required are available on
the computer, in order to install the drivers,
insert the original CD of the operating
system or make a connection to the Inter-
net during installation. Restart the com -
puter after installation, if necessary.
3) Call the reproduction/recording software to make
the required adjustments for the audio reproduc-
tion via the mixer or for audio recording from the
mixer (→ software instructions). It will then be
possible to operate the mixer according to chap-
ter 5.
If there is no sound, check the following adjust-
ments of the operating system of the computer:
– Audio input and output must be correctly as -
signed: If the corresponding USB port of the
mixer is used as an input, it must be selected as
a reproduction unit; if it is used as an output, it
must be selected for audio recording.
– The sound must be switched on.
– The corresponding volume controls must not be
set to minimum.
5 Operation
Prior to switching on, set the master control (1) to
“0”, then switch on the mixer with the switch
POWER (2). The power LED above the switch will
light up. Then switch on the units connected.
After operation, switch off the mixer with the switch
POWER. If the mixer is not used for a longer period,
disconnect the plug-in power supply unit from the
mains socket as it will have a low power consump-
tion even with the mixer switched off.
5.1 Basic adjustment of the input channels
First set all gain controls (6), equalizer controls (8),
and the crossfader (14) to mid-position.
To switch on the microphone, set the selector
switch MIC (13) from the left position “OFF” (micro-
phone off) to mid-position “ON” (LED above the
switch will light up). For the time being, set the
switch PAD (7) to the upper position.
Level control of a channel:
1) Use the selector switch (5) of the channel to se -
lect the input to which the audio source is
connected.
For channels 2 and 3, three inputs are availa-
ble: PHONO, CD, and USB 1 or USB 2.
– To select the USB port, set the selector switch
to “USB 1” or “USB 2”.
– To select the input PHONO, set the selector
switch to “PH/CD” and the sliding switch (16)
of the channel to “PHONO”.
CAUTION Never adjust the audio system and
headphones to a very high volume.
Permanent high volumes may dam -
age your hearing! The human ear will
get accustomed to high volumes
which do not seem to be that high
after some time. Therefore, do not
further increase a high volume after
getting used to it.
6
GB
D
A
CH
Windows ist ein registriertes Warenzeichen der Microsoft
Cor poration in den USA und anderen Ländern.
Windows is a registered trademark of Microsoft Corporation in the
U.S.A. and other countries.