
Operation Manual
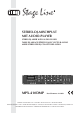


4 Connecting Units
To avoid interfering noise, switch off the mixer or
turn back the following controls to minimum prior
to connecting / disconnecting:
— BOOTH (7)
— MASTER (9)
— PHONES LEVEL (18)
1) Connect the audio sources to the appropri-
ate input jacks (28):
– jacks LINE and AUX to connect units with
line level (e. g. CD player, radio)
– jacks PHONO to connect turntables with
magnetic system
– jacks MIC to connect microphones
A maximum of three audio sources can be
connected to each input channel. Use the
appropriate input selector switches (6) to
switch between audio sources.
2) Connect a DJ microphone to the jack MIC
(11) on the front panel.
3) Connect the amplifier for PA applications to
the XLR jacks (25) or to the RCA jacks MAS-
TER (26). The two jack pairs may be used
simultaneously, e. g. for two amplifiers.
4) Connect a monitor system located in a sep-
arate control room to the jacks BOOTH (24).
Use the control BOOTH (7) to adjust the vol-
ume separately.
5) For audio recordings, connect a recorder to
the output jacks REC (27). The recording
level is irrespective of the position of the con-
trol MASTER (9).
6) Use headphones for prefader listening to the
signals of the individual input channels and to
the sum signal [i. e. the signals can also be
monitored when the appropriate channel
fader (5) is completely closed or the control
MASTER (9) is turned back to minimum].
Connect the headphones (minimum imped-
ance: 8 Ω) to the jack (19).
7) Use the mains cable provided to connect the
mains jack (22) of the mixer to a mains
socket (230 V~ / 50 Hz).
5 Operation
5.1 Switching on and off
To prevent switching noise and excessive vol-
ume, set the following output controls to mini-
mum prior to setting the mixer into operation:
— BOOTH (7)
— MASTER (9)
— PHONES LEVEL (18)
Use the POWER switch (21) to switch the mixer
on and off. When the mixer is switched on, the
LED indicator above the POWER switch will light
up.
5.2 Level control of the input channels
The following steps merely serve as an aid; other
procedures are possible.
1) First, make the following basic adjustments:
a) In all input channels, set the control GAIN
(4) and the tone controls HIGH and LOW
(14) to mid-position and completely close
the channel fader (5).
b) Turn back the control MIC LEVEL (12) to
minimum.
c) To deactivate the crossfading function,
set the two sliding switches (16) for the
crossfader to position 0.
d) Set the control BALANCE (20) to mid-
position.
2) To make sure that the input signal can be
indicated ahead of the level indicators (8),
turn up the control MASTER (9) to approxi-
mately
2
⁄3 of its maximum.
3) Advance the channel fader of the first chan-
nel used to approximately
2
⁄3 of its maximum
(position number 7 of the fader), use the input
selector switch (6) to select the signal source
and then feed an audio signal to the channel
(e. g. piece of music, microphone announce-
ment).
For channel CH 1, the audio player or the
Bluetooth receiver can be selected as a sig-
nal source; please refer to chapters 5.5 and
5.6 for more information on how to operate
the audio player and the Bluetooth receiver.
Set the input selector switch of channel CH 1
to the position MP3.
4) Observe the level indicators for an optimum
adjustment of the input amplification: Adjust
the control GAIN so that a level of approxi-
mately 0 dB is indicated for music peaks.
5) Adjust the sound, using the tone controls
HIGH for high frequencies and LOW for low
frequencies. Check the level of the channel
and, if necessary, use the control GAIN to
correct the input amplification.
6) Close the channel fader. Repeat this proce-
dure for all the other input channels.
5.3 Mixing audio sources
Crossfading between two channels
1) After level control of the input channels has
been completed, the channel faders (5) can
be used to mix the signals of the input chan-
nels or to fade them in and out. Always com-
pletely close the faders of the channels that
are not used.
2) Use the control MASTER (9) to adjust the
definite volume of the sum signal, and use
the control BALANCE (20) to adjust the
stereo balance. The signal level is indicated
by the level indicators (8). Usually, the opti-
mum level is obtained at 0 dB. However, if the
output level of the mixer is too high or too low
for the amplifier connected, attenuate or
boost the sum signal accordingly, making
sure that no distortions occur.
Use the control BOOTH (7) to separately
adjust the volume of a monitor system that
has been connected to the jacks BOOTH
(24).
3) For an announcement via a microphone con-
nected to the jack MIC (11), use the control
MIC LEVEL (12) to adjust the volume, and
the tone controls HIGH and LOW (13) to
adjust the sound. If it is necessary to improve
the audibility of the announcement, use the
faders to attenuate the volume of the input
channels CH 1 to 4.
4) The crossfader (15) allows crossfading be -
tween two channels. Use the sliding switches
(16) to select the two channels that are to be
crossfaded.
5.4 Prefader listening to the channels
CH 1 – 4 and to the sum signal
The input channels CH 1 – 4 can be separately
monitored via headphones even when the corre-
sponding channel fader (5) is closed. Thus, it is
possible to choose the next title to be played, for
example. In addition, the sum signal can be
monitored even when the control MASTER (9)
has been set to minimum.
1) For prefader listening to an input channel,
press the appropriate button CH 1 – 4 (17), or
for monitoring the sum signal, press the but-
ton MASTER.
2) Use the control PHONES LEVEL (18) to
adjust the headphone volume.
CAUTION Never adjust the audio system
and the headphones to a very high
volume. Permanent high volumes
may damage your hearing! Your
ear will get accustomed to high
volumes which do not seem to be
that high any more after some
time. Therefore, do not further
increase a high volume after get-
ting used to it.
9
GB