
Manual


Page 3-18
Chapter 3 Getting Started
3.10.3 Programming the unit for recording
To program the unit for recording, press MENU in the bottom right corner of the screen then press PROGram.
Use the UP and DOWN Arrow keys to highlight the “Record Setup” menu option. Press ENTER to go to the
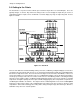
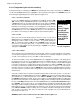
Record Setup Programming menu as shown opposite in Figure 3-15.
3.10.3.1 Set the record mode
Use the UP or DOWN Arrow keys to highlight “Record Mode” and press EN-
TER. Then use the UP or DOWN Arrow keys to select “Fill Mode”. Use the UP
or DOWN Arrow keys to select either “Fill to End” or “Cyclic” and press ENTER.
This will set the record mode and return to the Record Setup Menu. To select
Instantaneous or Average record mode, select “Inst/Avg All” to set all channels
at once to the required mode, (as opposed to Inst/Avg Indiv” to set each chan-
nel individually.) Use the UP or DOWN Arrow keys to select Average and
press Enter to select then press EXIT to return to the Record Setup menu.
3.10.3.2 Points
Now you need to decide which points you wish to record. Use the UP or
DOWN Arrow keys to highlight “Points” and press ENTER. A window pops up
and displays “Point 1 = NO*” or “Point 1 = YES*”. To record this point press
YES, to exclude this point press NO, then press ENTER to move to the next
point. There are fifteen possible points, 1 - 9, A, B C, D, E and F. Set points
1,2,3 and 4 to YES. Exit this menu at any time by pressing EXIT, or accept any
entry by pressing ENTER.
3.10.3.3 Record Rate
The record rate is the rate at which data is recorded to disk. It may be set independently for each channel,
or for all channels together, from a fastest time of eight times per second by setting the record rate to 0
seconds, or the slowest rate of once every 600 seconds (ten minutes).
To set the Record Rate, use the UP or DOWN Arrow keys to highlight “Record Rate”. This brings up the
Record Rate menu. Use the UP or DOWN Arrow keys to highlight “All rates”, ignoring Autorate and
Individual Rates for now. The display will show “secs (lo) >1 <” for seconds low. Use the numeric keypad
to enter the record rate 5 (5 seconds between samples, 0=8 samples/sec) and press ENTER. This sets the
record rate for all channels simultaneously. The display will then show “secs (hi)>0 <”. Use the numeric
keypad to enter the record rate 5 and press ENTER. Note for this purpose, both high and low record rates
are set the same. The record rate can be changed by an external event if the digital I/O option is fitted or by
an alarm event.
You need to arm the unit to record the actual data using the “Data on/off” menu selection. Use the UP or
DOWN Arrow keys to highlight “Data on/off” and press ENTER. The current record status will be shown as
“Record Data =Yes” or “Recorder Data =No”. Press YES then ENTER to enable recording of data or NO
then ENTER to inhibit data recording. There is also an option to enable ALARM or EVENT recording using
the “Alarm on/off” menu option. To actually begin recording you must exit until you get the command button
bar. Press the FUNCtion button and use the UP or DOWN Arrow keys to highlight Record On/Off and then
press ENTER. There are three choices - “Record Off” will stop recording, “Record On” will start recording
and “Trigger” enables automatic stop and start recording based on internal or external events that have been
initiated. Ensure there is a formatted disk in the drive then select “Record On”. From the pop-up window
press YES then ENTER to begin recording. Once a recording is started the drive light comes on periodi-
cally as data is stored to the disk. Also, the status line at the top right of the screen will indicate the
percentage of the disk used.
WARNING: Never remove a disk from the drive while the drive light is on.
Figure 3-15
Record Setup Menu
Alarm on/off
Record Mode
Points
Points (Trigger)
Record rate
Disk Full Alarm
Format Disk
Save CFG File
Load CFG File
Filename
Data on/off