
User guide
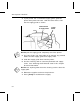
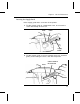
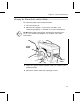

If the LED indicator does not come on when you print a test
label, press [On/Off] and [Feed] at the same time and
reattach the battery. Release [On/Off] and wait for the LED
indicator to turn amber before releasing [Feed]. The test label
prints automatically.
nFor resident Font IDs, the first number is the Font ID number,
and the second is the Monarch internal font number used for
internal use only. For example, 1:1000 indicates Font ID 1,
and Monarch internal font 1000. Font 16 is for Monarch
internal use only.
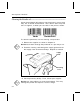
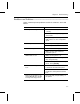
LED Indicator––––––––––––––––––––––––––––––––––––––––––––––
The LED indicator is located on top of the printer, between
[Feed] and [On/Off]. This LED indicator displays a variety of
printer states. To clear an error, press [Feed]. The table
below explains each state and its meaning.
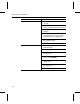
LED Indicator Status
Solid green Operational; On-demand mode
Solid amber Operational; Continuous mode
1/4 second blinking green Label ready to dispense
1/4 second blinking amber Online error (e.g., syntax, printing out
of range)
1/4 second amber/green Hardware error (e.g., out of supply,
jam, printhead open)
2 second blinking green Low or dead battery
2 second blinking amber Printhead overheat
2 second amber/green Firmware failure
n Do Not ignore the low battery condition. If you continue to
print with a low battery, the printer will eventually lock up with
a solid green LED indicator and won’t respond to key presses.
If this occurs, put a new, fully charged battery on the printer.
9450 Operator’s Handbook
6-2