Manual for LT2
Contents Monark Exercise AB ������������������������������������������������������ 4 Product Information ������������������������������������������������������ 6 Facts ���������������������������������������������������������������������������������������6 Serial number ��������������������������������������������������������������������������6 Initial operation ������������������������������������������������������������������������6 Power on crank or flywheel �������������������������������������������
Monark Exercise AB Monark has 100 years’ experience of bicycle production. The Monark tradition has yielded know-how, experience, and a real feel for the product and quality. Since the early 1900s, Monark’s cycles have been living proof of precision, reliability, strength and service. Those are the reasons why we are now the world leader in cycle ergometers and the market leader in Scandinavia in transport cycles.
Thank you for choosing a test cycle from Monark! Ideal position is important for a performance to reach its maximum and increases the potential for a perfect performance. The new setting options, along with an upgraded workload adjustment, make Monark's renowned bike even better.
Product Information Initial operation Facts LT2 is mechanically calibrated in the factory. The user may still want to check this. For the procedure, see section ‘Calibration’. NOTE! Before you start using the bike - remember to remove any transport protection and protective tape on the flywheel. Apply power to the test bike by first connecting the cable from the power adaptor to the test bike at the power connector (5) at the right side of the bike, see Fig: Overview.
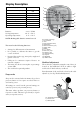
9 8 7 1 10 2 6 3 4 Fig: Overview Fig: Overview 1) Knob for horizontal adjustment of saddle 2) Scale for height adjustment saddle 3) Locking handle for height adjustment saddle 4) Machine plate (serial number) 5) Power input 6) Knob for height adjustment of handlebar and display 7) Scale for height adjustment handlebar and display 8) Resistance control unit 9) Display 10) Knob for horizontal adjustment of handlebar and display 5 LT2 7
Cycle adjustments Validation Adjustments of the bike The following procedure ensures that the bike works for daily use. Crank Steel, 52T, 172.5 mm standard, Q 146 mm Pedals 9/16”, combi SPD / Clips Saddle Moody Seat post Vertically: 530-940 mm (21"-37") Horizontally: 60 mm (2 1/3") Handlebar Handlebar stem Racing, Ø31,8 mm at clamp Vertically: 500-910 mm (19.7” - 35.
Pulse function Pairing display and chest belt The user's heart rate can be measured with a chest belt that senses the electronic output of the heart. Chest belt ANT+ is available as an accessory. Normally the display connects to the first ANT+ chest belt in "short range" and shows the heart rate until the chest belt is outside the "long range". If there is no ANT+ chest belt but a 5K chest belt in "short range", the heart rate from the 5K chest belt is displayed until the signal is lost.
Display Description 1 Display Pedal revolution (RPM) pedal revolutions / min HR bpm TIME min:sec Workload (WATT alt. kpm/min) 2 3 9 Watt 4 10 Speed km/h Distance km 5 11 Calories (KCAL) kcal % Max HR % 12 6 13 7 Batteries: Storing temperature: Operating temperature: 14 4 x 1.
Personal settings Alternative workload / force display Usually you are asked to set the personal data needed when you start a program or a test. This data can also be set before, during e.g. "Warm up" in Training program with this function. The meter displays workload in watts (default). If you want to display the workload in kpm / min instead, press the HEART button for 5 seconds. Then you can switch between WATT, KPM / MIN and current kpvalue using the (+/-) button.
User settings Units Kg, km, km / h, ml / min / kg are default. You can switch between the different unit combinations with (+/-) button. Here you can make individual adjustments to optimize the bike for your needs on first use and when needed. Press PLUS and PROGRAM for 5 seconds to set ‘User settings’.
Calibration NOTE! Calibration can only be done from the display! Current potentiometer value To calibrate the bike, you must have a 2 kg and a 4 kg calibration weight. These are available as accessories.
Training Personal data can be set for estimated HR (default HR is 185). See ‘Personal settings’. TIME Start Training program KCAL HR KM/H KM RPM To end the Training program, press START STOP and the results are displayed on three pages. Stop Training program Average value TIME KCAL KM/H RPM tot HR KM WATT WATT Min value TIME KCAL KM/H RPM Lo HR KM WATT QUICK START ’Quick start’ can be used as a separate program. (If START STOP is pressed, the TRAINING program is activated.
METS dAtA Set weight Weight kg 75 dAtA Set age Age 35 Set max HR The meter suggests an estimated max HR based on your age (220-age) Change if desired. dAtA Max HR 185 During the test METS and l/min are continuously counted and displayed. Calculation TIME Start METS program METS L/MIN RPM TIME METS RPM tot HR L/MIN WATT WATT The formula used (values from ASTRAND original table) to calculate VO2 at different workloads is: 0.2333 ... l / kpm = 0.01428 L / W (2.
Troubleshooting guide Symptoms Probable Cause / Corrective Action Display does not light up • • • • No batteries in the meter No current in the outlet (if power adaptor is used). Check the fuses. Check cables and connections. If you use power adaptor: Is it the correct power adaptor? Check that the transformer information (voltage, current, polarity, AC / DC) in section ‘Facts’ complies with the transformer which is used. No workload • • Check calibration.
Service Service check and Maintenance Note that the text about service and maintenance is universal and that all parts may not be relevant to your bike. It is important to carry out a regular service on your ergometer, to ensure it is kept in good condition. Always keep the bike clean and well lubricated. Warning Service action: • We recommend isopropyl alcohol to disinfect the surface of the bike. Use a damp but not wet cloth to clean the surface you wish to disinfect.
Batteries If the meter is battery-operated, the batteries are in a separate package at delivery. If the storing time has been long the battery power can be too low to make the computer act correctly. Batteries must then be changed. Manual pendulum bike / exercise bike: To loosen the brake belt on the bike remove all tension. Please note how the belt is assembled. Remove it from the bike. Attach the new brake belt and assemble the bike in reverse order.
Chain 1/2“ x 1/8“ 1 Check the lubrication and tension of the chain at regular intervals. In the middle of its free length the chain should have a minimum play (3) of 10 mm (1/4 inch). See Fig: Chain adjustments. When the play in the chain is about 20 mm (3/4 inch) the chain must be tightened. Otherwise it will cause abnormal wear of the chain and sprockets. Therefore it is always recommended to keep the chain play as small as possible.
Freewheel sprocket When replacing the freewheel sprocket remove frame covers if necessary. Remove the chain according to section ‘Chain 1/2” x 1/8”’. Loosen the axle nuts and lift off the flywheel. Remove the axle nut, washer, chain adjuster and spacer on the freewheel side. Replace sprocket-adaptor and assemble the new parts in reverse order according to the above. NOTE! Do not tighten the axle nut completely. It must be possible to loosen the sprocket-adaptor half a turn.
Spare parts list 7 6 5 8 9 1 2 3 4 Workload device left side Workload device right side 11 10 12 13 14 15 Pos. Qty. Art. No. Description 1 2 9125-86 Spring 2 1 9311-73 Brake belt LT, complete 3 1 9300-3 4 1 9300-24 5 1 9100-20 6 1 9311-59 7 1 8 1 Flywheel complete Pos. Qty. Art. No. Description 9 10 1 9384-27 Pulley 1 9326-164 Magnet 11 1 9300-475 Crank set, 52T, 172.
1 17 16 2 15 18 3 19 14 4 11 13 10 12 10 11 5 6 8 9 7 9 20 21 22 22 LT2
Fig: Power adaptor SE (accessory) Fig: Chest belt (accessory) Pos. Qty. Art. No. 1 1 9334-110 Description Pos. Saddle 1 9336-2 2 1 9311-23 3 1 9311-24 4 1 9311-21 Saddle post 5 2 8321-75 Pedals SPD with clips and strap 6 7 1 9301-3 2 9328-51 2 9328-26 1 9301-4 2 9328-51 2 9328-26 Qty. Art. No. Description 1 9311-3 Handlebar with stem and clamp, compl.
Version 1402 Art. No: 7950-378 KROONS VÄG 1, SE-780 50 VANSBRO, SWEDEN | WWW.MONARKEXERCISE.