Owners Manual
Introduction 1 Important Safety Instructions 2 Re-cycling 3 RoHS Declaration of Conformity 3 Unpacking 4 Amp Panel and Controls for R360 4 Amp Panel and Controls for R370HD 6 Positioning/Initial Set Up 9 Set Up 9 Specifications 10 Trouble Shooting 11 Guarantee and Service 11 Claims under this Guarantee 12 EC Declaration of Conformity 13 Data Protection 14 Owner Information 14 HD Introduction Thank you for your purch
Important Safety Instructions 1. Read these instructions. 2. Keep these instructions. 3. Heed all warnings. 4. Follow all instructions. 5. Do not use this apparatus with water. 6. Clean only with a dry cloth. Great care and attention has gone into the materials chosen to produce the product. A gentle wipe with a dry, clean cloth is all that is required to remove any dust. Treat it as you would a fine piece of furniture because that is how they have been designed. 7. Do not block any ventilation openings.
WARNING • TO PREVENT FIRE OR SHOCK HAZARD, DO NOT USE THIS PLUG WITH AN EXTENSION CORD, RECEPTACLE OR OTHER OUTLET UNLESS THE BLADES CAN BE FULLY INSERTED TO PREVENT BLADE EXPOSURE • TO PREVENT FIRE OR SHOCK HAZARD, DO NOT EXPOSE THIS APPLIANCE TO RAIN OR MOISTURE • TO PREVENT ELECTRIC SHOCK, MATCH WIDE BLADE PLUG TO WIDE SLOT AND FULLY INSERT.
Unpacking A feature of both the RadiusHD subwoofers is the exposed drive unit. Great care must be exercised at all times to ensure it is not damaged during unpacking and when finally sited in the room. Any physical damaged caused to the drive unit by not complying with this requirement will not be covered by warranty. The feet are attached to your product ready to use. The mains power cord is contained separately in the packaging and should be removed prior to unpacking the product.
1. Volume This control allows the subwoofer level or loudness to be adjusted in order that you can achieve a totally controlled, balanced sound. 2. Frequency This feature controls the upper frequency limit of the Radius 360HD. The table below will help you to select the correct frequency at which to crossover depending on your main speakers.
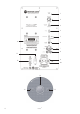
1 2 3 4 5 10 6 7 8 11 9 12 9a 13 15 14 6 RadiusHD
Amp Panel & Controls for R370 HD 1. Stand-by / On Indicator The LED indicates whether the unit is in stand-by mode or operational. It will be illuminated red when in stand-by, and green when operational 2. Crossover Frequency Control The crossover frequency control only operates when the low pass filter switch (refer to section 3.) is in the ‘In’ position. This control feature is used to set the upper frequency limit (low pass) of the R370HD.
8. RCA Line Level Outputs (Left & Right) RCA line level outputs are provided in order to use other sub woofers in conjunction with the R370HD by ‘daisy chain’ type connection. The outputs are link out only connections and do not provide any form of filtering. 9. IEC Mains Power Connector/ Fuse Location The R370HD is supplied with a two-pin mains input socket for connection to the mains supply. Use ONLY the appropriate IEC mains lead provided with the product. Also fitted is an external mains fuse.
Positioning/Initial Set Up Leave the subwoofer unplugged from the mains until the installation procedure is completed. The subwoofer should now be sited in the most suitable position, preferably not directly in the corner of the room as this may cause excessive bass ‘boom’. Once a desirable position is achieved it is important to check if the cables are long enough to reach comfortably without being under tension. The optimal control settings will depend entirely on your system configuration.
Specification R370HD Low frequency limit:- 27Hz (EQ1) 21Hz (EQ2) Upper frequency limit:- 40 – 120 Hz Variable Low pass filter alignment:- Active 4th order 24db/octave (two-stage filter) Cabinet Specification: - Sealed Cabinet of 25mm M.D.
Trouble Shooting Should you experience any technical, or set-up problems with your subwoofer please check the Trouble Shooting Guide below: My subwoofer will not turn on/no power. • Is the LED illuminated on the back of the unit? If not, then check your mains lead is properly connected both at the subwoofer and at the mains outlet. Also check the fuse of the mains plug (where fitted) and also the fuse in the subwoofer. See page 5 & 8 for further information on changing the fuse and it’s location.
Claims under this Guarantee The equipment should be returned in its original packaging to the original supplier where possible, or to any other authorised Monitor Audio dealer. If it is not possible to return the equipment by hand, then it should be sent carriage prepaid via a reputable carrier. If the original packing is not available replacement packaging can be purchased from Monitor Audio.
EC Declaration of Conformity EC Declaration of Conformity We, Monitor Audio Ltd. Unit 2,24 Brook Road Rayleigh Essex SS6 7XL England 08 Declare in own responsibility, that the R370HD product described in this manual is in compliance with Technical Standards/Council Directives: (LVD) 73/23/EEC Low Voltage Directive EN60065: 09.93+ A11:09.97 Safety requirements for mains operated electronic and related apparatus for household and similar use. (EMC) 89/336/EEC Electro Magnetic Compatibility EN55013: 08.
Data Protection We at Monitor Audio are committed to respecting the wishes and privacy of our customers. Any information you provide will be held in the strictest confidence and only used within the Monitor Audio organisation for the provision of services such as warranty claims or spare parts. We may wish to contact you in the future to ensure you are happy with the products and standards of service we provide and to keep you up-to-date with the latest products and promotions we have to offer.
Monitor Audio Ltd. Unit 2, 24 Brook Road Rayleigh, Essex SS6 7XL England Tel: 01268 740580 Fax: 01268 740589 Email: info@monitoraudio.co.uk monitoraudio.co.uk Designed in the United Kingdom Version 2.