
User's Manual


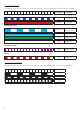


Table Of Contents

The ASB-10
ASB-10 Connections
1. Auxiliary
Used to connect an analogue stereo audio source
to the ASB-10 using a 3.5mm stereo mini jack
connector (refer to page 8).
2. Mains Input
Used to connect the ASB-10 to the mains (refer
to page 9).
3. Sub Out
Used to connect the ASB-10 to an additional sub
woofer (refer to page 8).
4. Digital Coaxial Input
Used to connect digital coaxial audio source to
the ASB-10 (refer to page 7).
5. USB Input
Used for firmware updates (refer to page ___)
6. Digital Optical Input
Used to connect digital optical audio source to the
ASB-10 (refer to page 7).
3
Title: ASB-1 CONNECTOR PANEL DECAL ARTWORK V1
Date: 1st July 2014
Notes:
1. CONNECTORS TEXT TO BE SILK SCREENED
COLOUR PANTONE COOL GRAY 3M.
2. BACKGROUND TO BE PANTONE BLACK 7M.
3. IMAGE FOR REFERENCE PURPOSES ONLY.
4. VERSION 1.
COAXIAL
SUB OUT
OPTICALAC INPUT
U
S
B
1
2
3
4
5
6
ASB-10 Buttons
1
2 3
4
5
6
1. Standby
Used to put the ASB-10 in and out of stand by mode. Holding it down for 5 seconds it searches for an
internet firmware update or a USB update.
2. Input Source Toggle
Used to toggle through the Auxiliary and Digital Inputs.
3. Bluetooth
Used to select the Bluetooth input and pair devices to the ASB-10.
4. 3D Sound
Used to change the sound of the ASB-10 to create a 3 dimensional effect (refer to page 16).
5. Volume Down
Used to reduce the volume of the ASB-10.
6. Volume Up
Used to increase the volume of the ASB-10