Owners Manual
Contents Page Important Safety Instructions 2 Safety Instructions For Fixing Your RadiusHD Loudspeakers to a Wall 3 Re-cycling 3 RoHS Declaration of Conformity 3 Background 3 Introduction 4 Setting up and Positioning 5 Positioning - Front Speakers 5 Positioning - Surround Speakers 5 Optimum Speaker Placement 6 Fixing to the Wall 7 Fixing the R45 / R90 8 HD HD to a Wall Fixing the R180 / R225 / R250 / R one HD
Important Safety Instructions 1. Please read these instructions. 2. Please keep these instructions. 3. Heed all warnings. 4. Follow all instructions. 5. Do not use this apparatus with water. 6. Clean only with a dry cloth. Great care and attention has gone into the materials chosen to produce the Radius HD Series. A gentle wipe with a dry, clean cloth is all that is required to remove any dust. Treat them as you would a fine piece of furniture because that is how they have been designed. 7.
Safety Instructions For Fixing Your Radius HD Loudspeakers to a Wall WARNING: For safety reasons do not attempt to fix these speakers to your wall if you are unsure of your ability to provide a secure and safe fixing. You will need to determine where to fit the bracket and the structure of the wall. If unsure, please obtain the services of a competent qualified trades-person. WARNING: Ensure that there are no water pipes, or electricity cables running behind where the wall bracket is going to be secured.
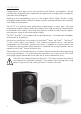
Introduction Congratulations and thank you for your purchase of the RadiusHD loudspeakers. We are confident they will provide years of enjoyment and pleasure as only high quality components have been used throughout. Building on the overwhelming success of the original Radius Series, RadiusHD brings redesigned cabinet profiles, enhanced cabinet structure, improved aesthetics and improved sonic balance and response. The R270HD has received major performance enhancements in every area.
Setting up and Positioning Although position and suitability will have been considered prior to purchasing your RadiusHD, this section will guide you through the optimum positioning and setting up of your loudspeakers. An illustration is provided on page 6 to assist you in ensuring your speakers are placed in the optimum positions. For instructions on fitting your RadiusHD speakers to a wall, please go to pages 7,8 & 9.
Optimum Speaker Placement Left Right Centre 0° 22° 30° 90° Surround Left 110° 135° 150° Rear Surround Right Rear Surround Left Figure 1.
Fixing to the Wall The R45HD & R90HD come with a bracket to mount it on the wall. It is fixed using the 2 button head screws on the back of the cabinet either side of the terminals. WARNING: Ensure that there are no water pipes, or electricity cables running behind where the wall bracket is going to be secured. Work from secure steps and avoid trailing wires. WARNING: Do not connect your speaker cable to the amplifier before connecting it to the speaker.
3. For fixing to a wooden wall/structure, use a 2mm drill bit to drill 2 pilot holes and use 25mm screws to secure the bracket. 4. Fully unscrew the 2 wall bracket mounting screws in the back of the speaker cabinet using the ‘hex’ key provide (Fig. 4). Using the two screws that have just been removed, attach the forked part of the wall bracket to the back of the speaker (Fig. 5). This should be tightened securely. Figure 4. Figure 5. 5. Connect the speaker cables as in Fig. 6.
Fixing the R180HD/ R225HD/ R250HD/ R oneHD to a Wall Additional Points to Remember • • • • • When using the wall fixing plate, the speaker will drop by 7.5mm due to the key hole fixing. Templates are supplied with the products to aid fixing. The grille badge can be rotated. Simply apply some pressure with your thumb/ finger and rotate it. Please allow no more than 200mm (8 inches) of slack cable protruding from the wall. All unused cable can be wound around the inside of the terminal panel.
R270 HD Feet and Spikes Your R270HD will come with rubber feet inserted into the plinth inserts (pictured below). This is for use on hard floors or when spikes are inappropriate to use. If you wish to use spikes, you can remove the rubber feet by simultaneously twisting and pulling them. The threaded inserts in the plinth will be revealed when the rubber feet are removed. Take the spikes and twist them in a clockwise direction in to the plinths.
100 x 100 x 100 3 15/16 x 3 15/16 x 3 15/16 0.95 (2 1/8) Drive Unit Complement External Dimensions. mm (H x W x D) External Dimensions. inch (H x W x D) Weight (each) Kg ( Ib) 2 (4 3/8) 7 13/16 x 4 15/16 x 5 1/2 198 x 125 x 140 1x 4” MMP2 cone bass/ mid driver. 1 x 25mm C-CAM gold dome tweeter 1x 3” MMP2 cone mid-bass driver. 1 x 20mm C-CAM gold dome tweeter 2.8 (6 1/8) 13 3/4 x 4 15/16 x 4 1/8 350 x 125 x 105 1x 4” MMP2 cone bass/ mid driver.
Guarantee and Service To validate your warranty please visit www.monitoraudio.co.uk within 30 days of purchase. When you register here you’ll gain free entry to our monthly prize draw! What’s more you’ll be the first to hear about the great things happening at Monitor Audio, including new products and events! This equipment has been fully tested prior to dispatch from the factory.
Data Protection We at Monitor Audio are committed to respecting the wishes and privacy of our customers. Any information you provide will be held in the strictest confidence and only used within the Monitor Audio organisation for the provision of services such as warranty claims or spare parts. We may wish to contact you in the future to ensure you are happy with the products and standards of service we provide and to keep you up-to-date with the latest products and promotions we have to offer.
EC Declaration of Conformity We, Monitor Audio Ltd. 24 Brook Road Rayleigh Essex SS6 7XL England 08 Declare in own responsibility, that the Radius HD products described in this manual is in compliance with Technical Standards/Council Directives: (LVD) 2006/95/EC Low Voltage Directive EN60065: 2002+A1: 2006 Safety requirements for mains operated electronic and related apparatus for household and similar use. (EMC) 89/336/EEC Electro Magnetic Compatibility EN55013: 08.90+A12:08.94+A13:12.
monitoraudio.co.
Monitor Audio Ltd. Unit 2, 24 Brook Road Rayleigh, Essex SS6 7XL England Tel: 01268 740580 Fax: 01268 740589 Email: info@monitoraudio.co.uk monitoraudio.co.uk Designed in the United Kingdom © 2008.