TABLE OF CONTENTS Parts ..........................................................................................................................3 Connecting Everything..............................................................................................4 Programming Servos.................................................................................................8 Servomotors...............................................................................................................
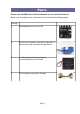
PARTS Please note that BBC micro:bit and batteries are not included in this kit. Before you do anything else, check that your kit includes the following items: Quantity 1 MonkMakes Servo for micro:bit 3 9g micro-servomotors, each with a selection of servomotor arms and screw for attachment. 1 4 x AA battery box for powering the servomotors and your micro:bit.
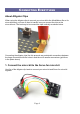
CONNECTING EVERYTHING About Alligator Clips When using the alligator clips to connect your micro:bit to the MonkMakes Servo for micro:bit board, you have to be a bit careful how you connect the clips at the micro:bit end. The best way is to connect the clips vertically as shown below. Connecting the alligator clips like this prevents any accidental connections between the large connectors with the holes in and the much smaller connectors (gold lines in the photo above) 1.
Its a good idea to use the red lead for 3V, black for GND and whatever colors you like for the other connections. 2. Prepare the Servomotors Take the servomotors out of their bags and remove one of the servo arms from the bag of arms and screws in each servomotor's bag. Push the servo arm onto the shaft of the servomotor as shown below.
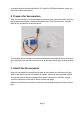
4. Connect the Battery Box The battery box has two leads coming out of it that need to be connected to the screw terminals on the Servo for micro:bit board. Using a screwdriver, unscrew both of the terminals in the terminal block and then insert the end of the red lead into the screw terminal marked with a + and do up the screw of the terminal. Do the same with the black lead in the terminal marked with a -.
the servomotors shudder as the last battery is put into place. 5. Program the micro:bit The servomotors are not going to do anything until you flash a program onto the micro:bit. So connect your micro:bit to your computer using a USB lead and then visit this webpage in your browser. https://makecode.microbit.org/_86KWdwTs9VRo Click on the Download link at the bottom of the window and copy the HEX file onto your micro:bit.
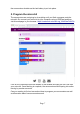
PROGRAMMING SERVOS When it comes to programming your micro:bit to make the servos move, you can use either Block code, as we just have, or you can use MicroPython. Blocks code The only block you need to control a servomotor is the servo write pin block that you will find in the Pins category of the Blocks editor. The block contains a drop-down list, where you specify which servomotor you want to change the arm position of. The value of 180 is the angle of the servo arm in degrees.
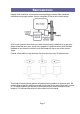
SERVOMOTORS Despite their small size, servomotors are surprisingly complex little machines, controlled using signal pulses. Here's a diagram of how a servo motor works. A DC motor (normal motor that can rotate continuously) is attached to a gear box, which drives the servo arm, but is also coupled to a position sensor that provides feedback to an electronic control circuit that keeps the servo arm at the correct angle. Control of the position uses a series of pulses arriving every 20 milliseconds.
TROUBLESHOOTING Problem: The servomotors don't move, and the Servo for micro:bit boards orange LED is NOT lit. Solution: This means that the Servo for micro:bit board is not getting power. This could be for a number of reasons: • The batteries are depleted • The battery box is connected the wrong way around • One or more of the batteries are the wrong way around Problem: The servomotors don't move, and the Servo for micro:bit boards orange LED is lit.
LEARNING micro:bit Programming If you want to learn more about programming the micro:bit in Python, then you should consider buying Simon Monk's book 'Programming micro:bit: Getting Started with MicroPython', which is available from all major book sellers. You can find out more about this and other books by Simon Monk (the designer of this kit) at: http://simonmonk.
MONKMAKES For more information on this kit, the product's home page is here: https://monkmakes.com/mb_servo_kit As well as this kit, MonkMakes makes all sorts of kits and gadgets to help with your maker projects. Find out more, as well as where to buy here: https://monkmakes.com you can also follow MonkMakes on Twitter @monkmakes. From left to right: Electronics Starter Kit for micro:bit, Power for micro:bit (AC adapter not included) and 7 Segment for micro:bit.