
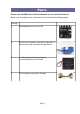
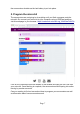
Data Sheet

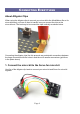


Its a good idea to use the red lead for 3V, black for GND and whatever colors you
like for the other connections.
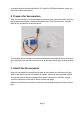
2. Prepare the Servomotors
Take the servomotors out of their bags and remove one of the servo arms from the
bag of arms and screws in each servomotor's bag. Push the servo arm onto the
shaft of the servomotor as shown below.
The smallest of the screws in the servomotor's bag is intended to secure the servo
arm into place, but you don't need to use it, as the arm should stay in place without
it.
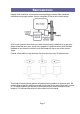
3. Attach the Servomotors
Now you can attach the servomotor's leads to the header pins sticking out of the
edge of the Servo for micro:bit board. Be careful, these can be sharp and scratch.
The servomotors must be connected the correct way around, with their orange
control connections to the left as shown on the next page.
Make sure that the servomotor's connectors are pushed properly into place on the
pins.
Page 5