
User`s guide

For Windows users
1 Click , or click Start and then click Run.
2 In the Start Search or Run box, type control printers.
3 Press Enter, or click OK.
The printer folder opens.
4 Select the printer.
Note: If the printer has a fax option, choose the appropriate printer model with the letters “PS.”
5 Right-click the printer, and then select Properties.
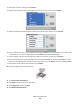
6 Click the Install Options tab.
7 Under Available Options, add any installed hardware options.
Note: If the printer has a fax option, select Fax, and then add it as an installed option.
8 Click Apply.
For Macintosh users
In Mac OS X version 10.5 or later
1
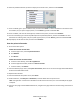
From the Apple menu, choose System Preferences.
2 Click Print & Fax.
3 Select the printer, and then click Options & Supplies.
4 Click Driver, and then add any installed hardware options.
5 Click OK.
In Mac OS X version 10.4 and earlier
1
From the Finder desktop, choose Go > Applications.
2 Double-click Utilities, and then double-click Print Center or Printer Setup Utility.
3 Select the printer, and then from the Printers menu, choose Show Info.
4 From the pop-up menu, choose Installable Options.
5 Add any installed hardware options, and then click Apply Changes.
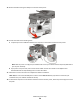
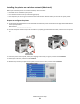
Additional printer setup
52