
Installation Instructions


STEP 3 INSTALL CUSTOM 3/4”
DOOR PANEL AND HANDLE
(ZIFI240 and ZIBI240 models only)
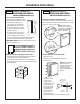
3/4” Overlay Panel Dimensions
Model ZIFI240 and ZIBI240 require
a field-installed overlay door panel.
• The overlay panel must be
secured to a 1/4” thick backer
panel that slides into the trim.
A .10” thick spacer panel must
be placed between the overlay
and backer panel.
• A custom handle of your choice,
supplied by your cabinetmaker,
must be installed on this overlay
panel. Countersink all screws into the backer panel.
Screws cannot protrude from the backer panel.
IMPORTANT NOTE: Maximum total weight for custom
door panel is 25 pounds.
1/4"
Backer
Panel
Door
.10 Inch
Spacer
Overlay
Panel
11
Installation Instructions
STEP 3 INSTALL CUSTOM 3/4”
DOOR PANEL AND HANDLE
(ZIFI240 and ZIBI240 models only)
A
B
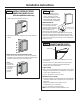
Custom Panel Hinge Routing Dimensions
Use a 3/4” router bit to cut a notch into the back side of
the assembled panel 3/8” toward the front of the overlay
panel, 3/4” deep and 7/8” wide.
3/4” Overlay Panel Dimensions (in inches)
A (Width) B (Height)
1/4” Backer 23-3/16” 29-9/16”
0.10” Spacer 22-1/2” 29-1/16”
3/4” Overlay 23-5/8” 30”
3/8”
7/8”
3/4”
Back side
of custom
panel
3/4”
7/8”
3/8”
NOTE: Right-hand models
illustrated. Cut notches on the
opposite side for left-hand fresh
food door swing models
ZIFI240 and ZIFS240.
Assemble overlay panels with glue and screws.
• Center spacer panel on the backer panel, left to right and
top to bottom. Secure the panels with glue.
• Center the spacer/backer panel on the overlay panel.
Secure with glue and screws. Countersink all screws into
the backer panel.
Spacer Panel
Backer Panel
Overlay Panel
Install custom door panel and handle:
• Open door to 90°.
• Remove 5 screws holding trim; lift off trim.
Retain screws.
• A custom handle
of your choice,
supplied by your
cabinetmaker, must
be installed onto
the overlay panel
before the panels
are slid into the
trim. Countersink
all screws into
the backer panel.
Screws cannot protrude from the backer panel.
Handle
Custom
Door Panels
Screws Must
Be Countersunk
Into Panel
NOTE: Right-hand models
illustrated. Follow the
same instructions on the
opposite side for left-
hand fresh food door
swing models ZIFI240 and
ZIFS240.