
Installation Instructions


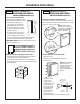


STEP 7 SLIDE PRODUCT INTO
THE CUTOUT
CAUTION
Do not push against the door panel
with your knees. Do not push or lift the unit by the door
handle. Damage may occur!
ATTENTION
Ne poussez jamais le panneau
de la porte avec vos genoux. Ne poussez jamais votre
appareil ou ne le soulevez jamais par
la poignée de porte. Vous pouvez l’endommager.
• Open the door and gently push the unit back into the
opening with your hands against the sides. Be careful
not to entangle power cord.
• In a standard 24” opening, the front face of the
stainless steel door will be flush with adjacent
cabinetry. A custom panel door may protrude 1-3/4”
beyond the surrounding cabinets.
• Check again to be sure the unit is level.
• If the unit is installed under a countertop, adjust the
leveling legs until the unit is resting firmly against the
underside of the countertop.
• If alignment with adjacent cabinetry is an issue, use
a shim to secure the unit against the underside of the
countertop.
STEP 8 SET TEMPERATURE
CONTROLS
• The temperature controls are preset. Refer to the
Owner’s Manual for more information. Allow 12–24
hours for the temperature to stabilize.
NOTE: The Fresh-Food Refrigerator or Bar Refrigerator with
Icemaker operate very quietly. You may not notice the unit
running, and when first installed, the fans and motor may
not come on immediately – this is normal. If the display is
lit and the light is working, the unit is operating.
Installation Instructions
13
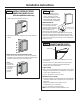
STEP 6 CONNECT POWER
• Connect power cord plug to a properly grounded
receptacle.
• Check to make sure power is on by opening the door
to see if interior light turns on.
• Bar Refrigerator with Icemaker – The interior fan runs
all the time except during defrost cycle when the door
is open.
• Fresh-Food Refrigerator – The interior fan runs all the
time except when the door is open.
See the Owner’s Manual for further explanation of the fan.