
Installation Guide


31-1000416 Rev. 0
15
STEP 2 INSTALL WATER LINE
(Cont.)
Shut off the main water supply.
Turn on the nearest faucet long enough to clear the line
of water.
• Install a shut-off valve between the icemaker water
valve and cold water pipe in a basement or cabinet.
The shut-off valve should be located where it will
be easily accessible.
• Turn on the main water supply and flush debris.
Run about a quart of water through the tubing into a
bucket. Shut off water supply at the shut-off valve.
NOTE: Saddle type shut-off valves are included in
many water supply kits. Before purchasing, make sure
a saddle type valve complies with your local plumbing
codes.
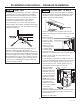
STEP 4 INSTALL ANTI-TIP
BRACKET (Cont.)
• Measure up 81-1/2” (207.01 cm) from the floor. Mark
this point on the wall.
• Using a level, draw a horizontal line on the wall at this
height.
• Locate at least 2 studs on the back wall. Mark these
points on the horizontal line.
• Place the bottom of the wall bracket with tabs on the
horizontal line. Align the center notch on the bracket
with the center line on the wall.
• The anti-tip wall bracket has a series of holes. Select 2
holes that match with the located studs. Make sure the
holes selected are on the center of the studs. Mark the
wall at these points.
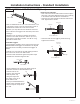
STEP 4 INSTALL ANTI-TIP
BRACKET
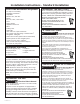
WARNING
Tip Over Hazard.
The unit is top-heavy and must be secured to prevent
the possibility of tipping forward.
AVERTISSEMENT
Risque de
basculement
L’appareil ménager est beaucoup plus
lourd en haut et il faut le maintenir en place pour éviter la
possibilité de son basculement vers l’avant.
ADVERTENCIA
Riesgo de Caídas
La unidad es pesada en su parte superior y se deberá asegu-
rar a fin de evitar posibles caídas hacia adelante.
• The kit supplied with the unit contains 2 lag bolts and
4 toggles with bolts. The wall bracket will be attached
to the wall in 4 places.
• Measure the opening where the unit is to be installed.
Mark the center with a vertical line.
NOTE: Commonwealth of Massachusetts Plumbing
Codes 248CMR shall be adhered to. Saddle valves
are illegal and use is not permitted in Massachusetts.
Consult with your licensed plumber.
Installation Instructions - Standard Installation
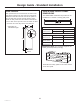
STEP 3 INSTALL SIDE PANELS
Skip this step when not using side panels
If you are using 1/4” side panels, they should be insert-
ed into the case trim.
Fasten the panels to the unit with stick-on hook and
loop fastener strips before setting unit in place.
Two Additional
Hole Locations at
Ends of Brackets
Center
Wall Bracket
Line On Wall
Wall Studs