
Owner`s manual

Installation
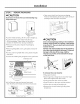
STEP 1 REMOVE PACKAGING
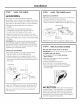
- CAUTION
Stand clear. The ends of the cut metal banding mag
snap toward gou.
• Cut the metal banding. Lift the carton straight up.
• Locate the two runner strips from the top
of the packaging. These strips will be used to
protect the kitchen floor during installation.
• Remove corner posts. Dispose of packaging
materials.
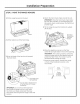
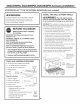
• Remove grill/griddle covers, grill grate and burner
grates.
• Lift out cast-iron griddle flue cover, grease troughs
and pads.
• Cut the ties holding the grill grate to the grill frame.
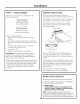
GriddleFlueCover
G
Ties
GreaseTroughs
• Lift off burner caps and remove foam pad,
then lift off burner heads and remove foam pad.
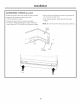
• Open oven door(s) and remove packaging.
Remove shelf holding broiler pan, tape, literature
package, shelf lubricant and probe.
\
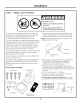
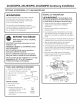
CAUTION
Doors and passagewags leading to the installation
location require at least 32" opening. If the opening
is less than 32", the oven door(s) and control knobs
must be removed.
REMOVETHE OVEN DOOR(S)ONLY IF NECESSARYto
move the range through the doorwags. To prevent
damage to the sides of the range, it will be
necessarg to pad the corners beneath the straps
on the hand-truck.
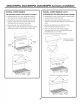
Hinge
Lock
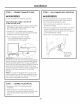
To remove the oven door(s):
• Fully open the door.
• Each hinge has a hinge latch. Close the hinge
latch down against the door frame.
• Firmlg grasp the door at the top sides.
• Close the door to the near-vertical position.
• Lift the door up and pull straight out.
• Remove the control knobs bg pulling them
straight out.
RemoveFoamPads
11