
Owner`s manual

– 65 –
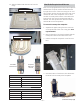
Oven Light Assemblies
Each main oven is equipped with two halogen light
assemblies located on the side walls of the oven.
The oven door switch monitors the position of the
oven door and provides this information to the
logic board. The logic board operates the light relay
located on the relay board. The lights come on when
the door is opened or when the oven is in a cooking
cycle. The oven lights do not come on during self-
cleaning or if the Sabbath Feature is set.
Each light assembly consists of a removable light
cover with two locking clips, a light housing with
three light bulb sockets and three halogen light
bulbs.
To remove the light assemblies from 30- and 36-in
models, and from the right side of the main oven
and the left side of the companion oven on 48-in
models, follow procedure A.
To remove the light assemblies from the left side of
the main oven and the right side of the companion
oven on 48-in. models, follow procedure B.
Procedure A:
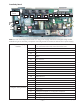
Remove the range from the installation. (See 1.
Installation.)
Remove the back panel. (See 2. Back Panel.)
Remove the side access panel. (See 3. Side Access
Panel.)
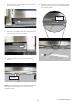
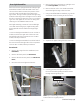
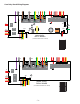
Disconnect the oven light wire harness.4.
Disconnect
Side Access Panel
5. Remove the racks, rack support, and light cover.
(See Oven Light Bulbs, this section.)
6. Remove the two 1/4-in. hex-head screws that
attach the light housing to the oven liner.
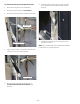
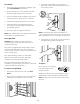
7. Using a small fl at blade screwdriver, pry out the
4 tabs that lock the housing to the oven liner.
Tabs (1 of 4)
8. Separate the light housing from the oven liner.
Wire Entry Hole
9. Carefully pull the oven light housing from
the oven liner while guiding the wire harness
through the wiring entry hole.
Note: Upon reassembly, ensure displaced insulation
is returned to it's original position.
(Continued next page)