Design Guide with Installation Instructions Wine Chiller, Wine Reserve and Beverage Center monogram.
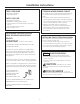
Safety Information BEFORE YOU BEGIN: WARNINGS: Read these instructions completely and carefully. • Use this appliance only for its intended purpose. • Immediately repair or replace electrical service cords that become frayed or damaged. • Unplug the unit before cleaning or making repairs. • Repairs should be made by a qualified service technician. IMPORTANT – Save these instructions for local inspector’s use. IMPORTANT – Observe all governing codes and ordinances.
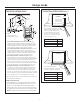
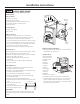
Design Guide THE INSTALLATION SPACE (cont.) THE INSTALLATION SPACE Flush Installation Dim. A Filler panel or cleat to be set back even with front of case. CABINET Front edge of product case Front face 110° These products will fit flush to adjacent cabinets when installed with a Dim. A-width filler panel or cleat. The filler panel should be recessed or set back behind the door and even with the front edge of the product case. NOTE: Handle and handle standoff depth is 1-3/4" Product 120° Dim.
Design Guide PRODUCT CLEARANCES SIDE-BY-SIDE INSTALLATIONS The stainless steel wine chiller, wine reserve and beverage center is factory set for a 110° door swing. Models that accept custom panels have a 95° door swing. When installed in a corner: • Allow 4" min. clearance on the hinge side for the 90° door swing and to allow racks to slide out. • Allow 10" minimum clearance on the hinge side for a full 110° door swing. (Models ZDWI240WII and ZDBI240WII have a 95° door swing.
Installation Instructions TOOLS REQUIRED Staining Wood Drawer Fronts • #2 Phillips screwdriver • Adjustable wrench The drawer fronts are unfinished cherry wood. During use, oil from hands may accumulate and stain the wood. • The drawer fronts may be stained and sealed to match adjacent cabinetry. The tinted glass will make the stained wood appear darker. A true color match can be seen only when the door is opened. • Apply the stain and sealer according to the manufacturer’s instructions.
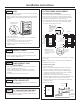
Installation Instructions STEP 2 REVERSE DOOR SWING SKIP THIS STEP IF DOOR SWING SUITS THE INSTALLATION Install 3 Hinge Screws Parts Included: • Top left case hinge • Bottom left case hinge • Left and right side decorative hinge cover • Decorative hinge screw hole cover • Torx® driver bit Remove Top Hinge Hinge Pin and Bracket Tools Required: • Phillips screwdriver • Electric drill Door Stop and Cam Riser Remove the door: • Flatten the shipping carton to use as a pad.
Installation Instructions CUSTOM FRAME PANEL MODELS STEP 3 LEVEL Model ZDWI240WII and ZDBI240WII These models require a custom panel frame surrounding the glass. There are two options: the panel may be 29-3/4" or 30" high. A 30" panel requires a notch cut into the bottom of the panel to avoid interference with the hinges. • Rout the back side of the panel to the dimensions shown. • A custom handle of your choice must be installed before the panel is mounted onto the door.
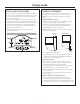
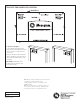
TEMPLATE FOR NAMEPLATE LOCATION To position nameplate: • Cut template along dotted line. • Hold or tape template behind glass door so that it is visible from the front side. • Remove backing from nameplate. • Place nameplate onto front side of door, matching illustration on the template. IMPORTANT: Nameplate must be placed on the opposite side of the door handle. Note: While performing installations described in this book, safety glasses or goggles should be worn.