
Owner`s manual


7
Installation
Professional Gas Cooktops
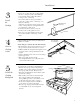
Use a hand-truck to move this cooktop.
Before moving the cooktop indoors:
• Remove outer carton and packing.
• Remove the straps holding the cooktop to the
skid.
• Remove the grates and drawers below the
knobs.
• Remove grill and/or griddle covers. DO NOT
ATTEMPT TO REMOVE A GRILL OR
GRIDDLE ASSEMBLY.
• Flatten the carton and use a piece as a pad
on the bottom and back of the hand-truck.
Lift the cooktop onto the hand-truck
standing on its end, with the bottom of the
cooktop resting against the back of the
hand-truck.
Move the cooktop indoors:
If door and passageways into the installation
location are less than 30" wide, remove the
cooktop knobs.
Remove
Packaging
1
Step
2
Cut the
Countertop
Opening
Step
8"
2-1/2"
1/2"
34-7/8"
22-3/4"
Monogram
FRONT
REAR
FRONT
REAR
FRONT
REAR
26-5/8"
8-7/16"
35-7/8"
48" wide models are designed to fit in 48" or wider base cabinets
36" wide models are designed to fit in 36" or wider base cabinets
Measure carefully when cutting the countertop.
Make sure sides of the opening are parallel.
• These cooktops requires 8" free space below the
countertop.
• These Cooktops are designed to hang from the
countertop from its rear and side flanges.
• Smooth any rough edges on the countertop
before installing the cooktop.
–Formica countertop edges must be finished.
The countertop must be strong enough to
support the weight of the cooktop.
• Support cleats can be secured to cabinet sides.
OR
• Build a support deck or box inside the cabinet
which will support the weight of the cooktop.
–Build the support box using a solid material,
cut a 5" x 5" square in the left rear corner for
the gas inlet and power cord clearances.
Counter Sunk
Screws
Adjacent Cabinet
and Countertop
8"
2-1/2"
7/8"
46-1/8"
22-3/4"
26-5/8"
8-7/16"
47-7/8"
Monogram
FRONT
REAR
HEATING
FRONT
REAR
FRONT
REAR