Design Guide with Installation Instructions Fresh-Food Refrigerator ZIFI240 ZIFS240 Bar Refrigerator with Icemaker ZIBI240 ZIBS240 monogram.
Safety Information BEFORE YOU BEGIN: WARNING: • Use this appliance only for its intended purpose. • Immediately repair or replace electrical service cords that become frayed or damaged. • Unplug the unit before cleaning or making repairs. • Repairs should be made by a qualified service technician. Read these instructions completely and carefully. IMPORTANT – Save these instructions for local inspector’s use. IMPORTANT – Observe all governing codes and ordinances.
Installation Instructions CONTENTS CARING FOR YOUR STAINLESS STEEL Important Information Parts Required..............................................................................................................3 Caring for Your Stainless Steel ..........................................................................3 Tools, Hardware ........................................................................................................3 Staining Wood Drawer Fronts .....................................
Design Guide For models ZIFS240 and ZIBS240 with Stainless Steel Doors and Handles THE INSTALLATION SPACE THE INSTALLATION SPACE (cont.) Flush Installation NOTE: Water line location for ZIBS240 model only CABINET 1/4" Filler panel or cleat to be set back even with front of case. CABINET Front edge of product case Front face 110° These products will fit flush to adjacent cabinets when installed with a 1/4" filler panel or cleat.
Design Guide For models ZIFS240 and ZIBS240 with Stainless Steel Doors and Handles SIDE-BY-SIDE INSTALLATIONS PRODUCT CLEARANCES For a complete refreshment center, install a Fresh-Food Refrigerator beside a Double-Drawer Refrigerator, Beverage Center or Wine Chiller/Wine Reserve. Or, install a Refrigerator with Icemaker beside a Wine Chiller/Wine Reserve.
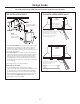
Design Guide For models ZIFI240 and ZIBI240 with Custom Door Panels and Handles THE INSTALLATION SPACE THE INSTALLATION SPACE (cont.) Standard Installation NOTE: Water line location for ZIBI240 model only CABINET CABINET Front edge of product case Dim. A Front face NOTE: If installing between frameless cabinets, a 1/2" wide filler strip or side panel may be needed on the hinge side.
Design Guide For models ZIFI240 and ZIBI240 with Custom Door Panels and Handles SIDE-BY-SIDE INSTALLATIONS PRODUCT CLEARANCES For a complete refreshment center, install a Fresh-Food Refrigerator beside a Double-Drawer Refrigerator, Beverage Center or Wine Chiller/Wine Reserve. Or, install a Refrigerator with Icemaker beside a Wine Chiller/Wine Reserve. • A side-by-side installation requires at least a 47-1/2"wide opening. No trim kits required.
Installation Instructions STEP 1 REMOVE PACKAGING AND INSTALLATION PARTS STEP 2 INSTALL CUSTOM 3/4" DOOR PANEL AND HANDLE (CONT.) (ZIFI240 and ZIBI240 models only) • Remove corner blocks and foam drawer stops. • Remove all packing material, tape and protective plastic coverings. • Remove the toekick attached to the back of the unit. • Remove the custom panel attached to the front of the unit. Assemble overlay panels Overlay Panel with glue and screws.
Installation Instructions STEP 2 INSTALL CUSTOM 3/4" DOOR PANEL AND HANDLE (CONT.) STEP 3 LEVEL • Use an adjustable wrench to turn the leveling legs and raise or lower the product. For built-in installation, adjust the leveling legs slightly below the bottom of the countertop. INSTALLATION TIP: Measure floor to underside of countertop inside the opening.
Installation Instructions STEP 5 CONNECT POWER STEP 7 SET TEMPERATURE CONTROLS • Connect power cord plug to a properly grounded receptacle. • Check to make sure power is on by opening the door to see if interior light turns on. • Bar Refrigerator with Icemaker – The interior fan runs all the time except during defrost cycle when the door is open. • Fresh-Food Refrigerator – The interior fan runs all the time except when the door is open. See the Owner’s Manual for further explanation of the fan.
Notes 11
NOTE: While performing installations described in this book, safety glasses or goggles should be worn. For Monogram® local service in your area, call 1.800.444.1845. NOTE: Product improvement is a continuing endeavor at General Electric. Therefore, materials, appearance and specifications are subject to change without notice. Pub. No. 31-51544-6 Part No.