
Installation Instructions


35
31-1000600 Rev. 1
Installation Instructions - Dual Retro-Fit Installation
STEP 3 PREPARING UNIT FOR
INSTALLATION
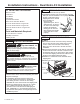
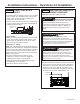
Ŷ Unpack the heater Unification Kit (ZKUN) and make
sure all of the components on the list are included.
NOTE: Ensure the heater connector cord is toward the
top of the unit when installed.
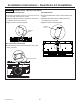
Ŷ Place the right hand unit in front of the installation
opening in a way that the unit is in front of the
intended installed location.
Ŷ
Install adhesive heater on the outside of the unit to the
left side of the case. Install heater 4” below the case
top. Heater should be centered front to back on the
metal case.
NOTE: ZKUN is not compatible with ZIF181 models.
This kit may be installed on an adjacent compatible
model to the right of ZIF181 models for unification.
NOTE: The heater installation is available only on the
left side of compatible models.
STEP 3 PREPARING UNIT FOR
INSTALLATION (Cont.)
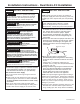
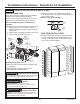
Ŷ Install the transformer into the case top assembly:
1. Remove cover top by removing eight #8 hex screws
and keep aside for assembling back the cover top.
2. Place the transformer into the case top provided in
ZKUN kit and secure it with the existing (1/4”) hex
screws to left front of case top.
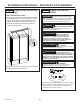
3. Connect the 2 pin transformer connector to the
heater connector and 3 pin connector to panel
control, make sure locking tabs are engaged.
4. NOTE: Verify the master switch is on.
5. Assemble the cover top with screws save from
previous step.
WARNING
Electrical Shock
Hazard. To avoid the risk of electric shock, make
sure the power cord is not plugged into the wall outlet.
Clips
Adhesive
Heater
4”
AVERTISSEMENT
Risque
d’électrocution.
Pour prévenir le risque
d’électrocution, assurez-vous que le cordon électrique
n’est pas branché dans la prise murale.
ADVERTENCIA
Riesgo de Descarga
Si no se siguen estas instrucciones, se podrá producir
la muerte, incendios o descargas eléctricas.
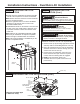
STEP 3 PREPARING UNIT FOR INSTALLATION (Cont.)
2 Pin
Connector
to Heater
Connector
3 Pin
Connector
Transformer
Master Switch
#8 Hex Screws
Cover Top
Enclosure assembly upper
is hidden for clarity.
Do NOT Remove
Wire Standoff