
Installation Instructions


57
31-1000600 Rev. 1
Installation Instructions - Single Integrated Installation
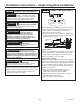
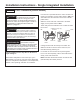
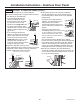
STEP 12 INSTALL AUTOFILL PITCHER ASSEMBLY (Some Refrigerator Models)
Ŷ Locate the AutoFill pitcher cover on the left side of
the refrigerator’s interior. Remove the one T20 Torx
screw holding the cover in place towards the rear of
the cover. Retain this screw for attachment of AutoFill
assembly.
Ŷ Slide the cover forward to remove. This reveals an
electrical connector and a water tube.
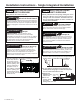
Ŷ Remove the AutoFill assembly from the box. Connect
the 4 pin connector from the AutoFill assembly to the
connector in the compartment wall.
Ŷ Ensure that the locking tab on the connector is fully
engaged.
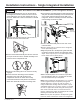
Ŷ Connect the water line fitting from the AutoFill
assembly to the water tube located in the
compartment. Ensure the water tube is firmly
connected and will not easily become unattached.
Water tube should be inserted to the tubing mark.
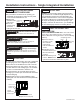
Ŷ Conceal wires and tubing inside the wall compartment
and place the AutoFill assembly onto the forward end
of the mount until flush with the interior wall of the
refrigerator. Slide the assembly toward the back wall
until mounting screw hole is visible.
Ŷ Secure AutoFill assembly with the T20 Torx screw
removed earlier.
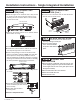
Ŷ Ensure supply water is connected to the refrigerator
before proceeding further.
Ŷ Align the pitcher lid to the dispenser guide and slide
the pitcher toward the back of the refrigerator until it
stops. There may be up to a 5 second response time
before water starts to fill the pitcher.
Ŷ Water will fill the pitcher until it reaches a specified
level and will then shut off. It is normal for the water
level to be below the top of the pitcher.
NOTE: After installing the AutoFill pitcher, run 2 gallons
of water (approximately 5 full pitchers) through the
AutoFill dispenser to remove air from the system. A
newly installed filter cartridge will cause water to spurt
and dribble until the air is out of the system. It is normal
for water to appear discolored during the initial system
flush. Water color will return to normal after the first
minutes of dispensing. Wash the AutoFill pitcher and lid
following the initial flush before using.
NOTE: Do not place the pitcher in the dispenser guide
before the water connection is made to the refrigerator.
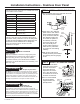
Screw
AutoFill
Assembly
Mount
Compartment
Screw
Cover