
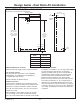
Installation Instructions


34
31-1000600 Rev. 0
Installation Instructions - Dual Retro-Fit Installation
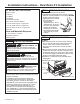
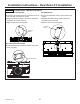
STEP 2 INSTALL WATER LINE
(Cont.)
NOTE: Saddle type shut-off valves are included in
many water supply kits. Before purchasing, make sure
a saddle type valve complies with your local plumbing
codes.
NOTE: Commonwealth of Massachusetts Plumbing
Codes 248CMR shall be adhered to. Saddle
valves are illegal and use is not permitted in
Massachusetts. Consult with your licensed plumber.
Ŷ Connect the jumper water line from the ZKR42N or
ZKR48N Trim Retro Kit to the house cold water line.
Tighten the compression nut hand tight, then tighten
one additional turn with a wrench. Overtightening
can cause leaks!
Ŷ Connect the other end of the jumper water line to the
water fitting tee supplied in the trim retro kit. Tighten
the compression nut hand tight, then tighten one
additional turn with a wrench. Overtightening can
cause leaks!
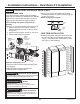
Ŷ Route 1/4” OD copper or SmartConnect
™
(WX08X10006) plastic tubing between water fitting
tee and the water connection location at the front of
the unit.
SmartConnect
™
Refrigerator Tubing Kits are
available. One 8’ (2.4m) water line (WX08X10006) is
needed for each unit.
Ŷ Tubing should be long enough to extend to the front
of the unit. Allow enough tubing to accommodate
bend leading into the water line connection. Unit
must be tipped on its side to route waterline
underneath and to the front of the appliance.
NOTE: The only GE Appliances approved plastic
tubing is supplied in the SmartConnect
™
Refrigerator
Tubing kits. Do not use any other plastic water supply
line because the line is under pressure at all times.
Other types of plastic may crack or rupture with age
and cause water damage to your home.
Ŷ Tape the jumper waterline and water fitting tee to the
back wall. The waterlines will be taped to the floor
using masking tape after anti-tip bracket installation.
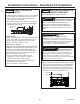
Water Fitting Tee
Water Line Jumper
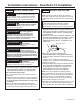
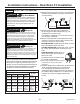
STEP 2 INSTALL WATER LINE
Ŷ
A cold water supply is required for automatic icemaker
and AutoFill pitcher operation. The water pressure
must be between 40 and 120 p.s.i. (275-827 kPa).
Shut off the main water supply.
Turn on the nearest faucet long enough to clear the
line of water.
ŶInstall a shut-off valve between the water valve and
cold water pipe in a basement or cabinet. The shut-
off valve should be located where it will be easily
accessible.
ŶTurn on the main water supply and flush debris.
Run about a quart of water through the tubing into a
bucket. Shut off water supply at the shut-off valve.
WARNING
Connect to potable water supply
only. A cold water supply is required for automatic
icemaker operation. The water pressure must be
between 40 and 120 psi (275-827 kilopascals).
WARNING
ELECTRIC SHOCK HAZARD
Attach tubing clamp using existing hole only. DO
NOT drill into the refrigerator.
AVERTISSEMENT
Raccordez l’appareil à
une alimentation d’eau potable seulement. Une
alimentation d’eau froide est requise pour faire
fonctionner la machine à glaçons et le pichet à
remplissage automatique. La pression d’eau doit se
situer entre 40 et 120 psi. (275 à 827 kPa).
AVERTISSEMENT
RISQUE DE DÉCHARGE
ÉLECTRIQUE
Fixez le collier de serrage dans le trou présent seulement.
NE PERCEZ PAS dans le réfrigérateur.
ADVERTENCIA
Realice la conexión a un
suministro de agua potable únicamente. Se requiere
un suministro de agua fría para el funcionamiento de la
máquina de hielos automática y de la jarra de llenado
automático. La presión del agua deberá estar entre 40
y 120 p.s.i. (275 – 827 kPa).
ADVERTENCIA
PELIGRO DE DESCARGA
ELÉCTRICA
Adhiera la abrazadera de la tubería usando el agujero
existente únicamente. NO perfore el refrigerador.