
Installation Guide


10
31-1000190 Rev. 1
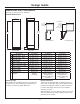
Installation Instructions - Reversing the Door Swing
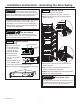
STEP 8 REMOVE HINGES FROM
DOOR
Ŷ Remove 3 screws securing each hinge from the top
and bottom of the door and one screw securing the
support bracket to the door (T-30 Torx)
Ŷ Move the hinge assembly to the opposite end of the
door - top hinge to the bottom and bottom hinge to
the top. Hinge, L-bracket already attached to hinge,
and support bracket will all move together.
Ŷ 2 shims between the hinge bracket and door will
be moved to the other side -
save for installing the hinge.
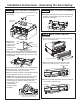
WARNING
Door Hinge Pinch
Point Hazard
Door hinges are under tension and should be left in
the open position throughout the reversal process.
Closing the hinge can lead to a finger pinch point
hazard.
Hinge
Support
Bracket
Shims
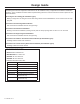
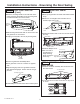
STEP 6 REINSTALL THE
ENCLOSURE (Cont.)
Ŷ,QVHUW¿OWHULQWRSRVLWLRQDQGURWDWHóWXUQFORFNZLVH
XVH¿OWHUUHPRYDOWRROLIQHHGHG
Ŷ5HWXUQ¿OWHUUHPRYDOWRROWRPRXQWLQJKRRN
Ŷ
Close the compartment door.
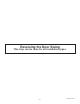
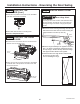
STEP 7 REINSTALL THE FRONT
ACCESS COVER
Ŷ Put the access cover back onto the unit and secure
with two 1/4” hex head screws.
Ŷ Verify the two 1/4” hex head screws are assembled
to handle side of the products for both freezer and
fresh food columns.
1/4” Hex Screws
Access
Cover
1/4” Hex
Screws