
Installation Guide


7
31-1000190 Rev. 1
Installation Instructions - Reversing the Door Swing
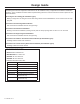
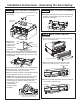
STEP 2 REMOVE DOOR
Ŷ Open the door to the open position.
Ŷ Have a second person support the open door.
Ŷ Remove 2 T30 Torx screws securing the bottom
hinge to the case.
Ŷ Remove the 2 T30 Torx screws securing the top
hinge to the case.
Ŷ Place the door on a protected work surface (to
prevent scratches), liner side down.
NOTICE: Door hinges will remain in the open position
during the door reversal procedure.
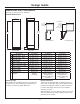
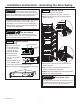
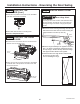
STEP 1 REMOVE UPPER
ENCLOSURE
Ŷ Open the front cover of
the enclosure to 90°.
Locate filter and filter
removal tool. Filter
should be as shown.
Ŷ5RWDWH¿OWHUóWXUQ
counterclockwise
XVH¿OWHUUHPRYDOWRROLI
needed).
Ŷ3XOO¿OWHUWRZDUG\RXWR
remove. NOTE: Water
V\VWHPZLOOQRWIXQFWLRQZLWKRXW¿OWHULQSODFH
Ŷ Remove 6 screws securing front enclosure to top case.
WARNING
Follow all steps when reversing the
door swing. Failure to follow these instructions, leaving
off parts, or overtightening screws, can lead to the door
falling off and result in injury and property damage.
WARNING
Door Hinge Pinch
Point Hazard
Door hinges are under tension and should be left in the
open position throughout the reversal process. Closing
the hinge can lead to a finger pinch point hazard.
Ŷ If installation will require the door swing to be reversed,
follow these directions to reverse the door swing
BEFORE the unit is removed from the shipping skid.
Ŷ Instructions for reversing a RH swing refrigerator are
shown in the following steps.
WARNING
Tip Over Hazard.
This appliance is top heavy, especially with the door
open, and must be secured to prevent tipping forward
which could result in death or serious injury.
Screws
Screws
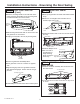
1/4” Hex Screws
Filter Removal Tool
Filter
Mounting
Hook
Compartment Door