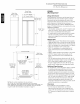
GE Monogram _ 36" Built-In Refrigerators Custom Options Guide and Installation Instructions With Custom and Trim Kit Installation Models: These Monogram designed built-in to be customized door and grille panels. panels are with decorator installed panels Lexan _ and Stainless Optional range ZISB36D trim will accommodate 1/4" thick custom or optional Steel panel kits. trim kits allow an even broader of custom appearance this booklet carefully desired appearance options.
Before you begin - Read these instructions completely and carefully. IMPORTANT - Save these instructions for local inspector's use. IMPORTANT - OBSERVE ALL GOVERNING CODES AND ORDINANCES. Note to Installer - Be sure to leave these instructions Note to Consumer - Keep these instructions vivl_, ___ This appliance lib III _1i_ II li [|] with the Consumer. with your Use and Care Book for future reference.
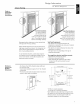
Design Information 36 " Built-In Advance Flush Refrigerator Planning or Semi-Flush Enclosure Installations / True Flush Installation Semi-Flush Installation In a flush installation, These refrigerators can also be installed the refrigerator doors semi-flush will align evenly with the front face of adjacent cabinet doors. The refrigerator blends into the surrounding Monogram built-in refrigerators cabinetry. can be installed flush frame around the opening.
Design Information 36" Built-In Installation Refrigerators Examples Side panels are required whenever the sides of the refrigerator will be exposed. Therefore, the rough-in dimensions must allow for side panel thickness. In both a flush and semi-flush installation, the finished dimension, (the width of the opening after side panels are installed), must accommodate the full width of the refrigerator.
Design Information 36" Advance These refrigerators planning exterior decorator appearance options are designed to be customized door and grille panels. Field installed with custom door and grille panels are required. Factory installed trim accommodates panels, Lexan (R_ or stainless Built-In Refrigerator You should: 1. Select the appearance option. 2. Order the trim kit(s) for that option. 1/4" thick custom steel panel kits. 3.
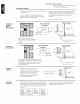
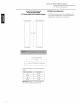
Custom Panel Dimensions 36" BzHlt-ln Refrigerator ZIS36N Front View (not to scale) Side View not to scale --24 3/4"-- --35" --36" (Non-dispenser) Case Width/ Overall Design Width Information Cutout dimensions, 12 1/4" max 10-3/4" rrfin determined clearances and side panel sizes are by the many installation options Side panels must be used whenever refrigerator will be exposed.
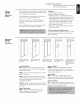
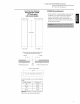
Custom Panel Dimensions 36 " Built-In Custom Door Panel Dimensions Using Standard Trim ZIS36N 1/4" thick panels or Panels secured to 1/4" thick backing Standard Freezer Panel Fresh Refrigerator (non-dispenser) Trim with 1/4" Panels • 1/4" Panels: Cut panels to size. • Custom handles with 1/4" door panels require Trim Kit ZKH1 (or ZKHSS1 for tubular-stainless steel handles).
Custom Panel Dimensions 36" Built-In Custom Door Panel Dimensions ZIS36N Refrigerator (non-dispenser) Using Trim Kit ZKT36 314"thick panel with standard handle • The ZKT36 trim kit provides for the installation of 3/4" custom door and grille panels, using the standard fulllength handle. Freezer Panel Fresh Food Panel 67 15/16" _19 _15 1t16% 1/16", Custom GriHHePaneH 35 1t2" Over 1/4" Thick (3/4" max) Panel Grille Panel height can vary to fill installation height.
Custom Panel Dimensions 36" Built-In Custom Door Panel Dimensions ZIS36N Using Trim Kits ZKT36 3/4" thick panel Panel Fresh Food (non-dispenser) • ZKT36 and ZKHT1 installed together provides for the installation of 3/4" custom door and grille panels, with custom handle Freezer Refrigerator Panel using a custom handle, of your choice. Order ZKHTSS1 for tubular stainless-steel handles. Cut panels to size, rout the handle side of the panels as shown below and install.
Custom Panel Dimensions 36" BzHlt-ln Refrigerator ZISW36D ZISB36D Front View (not to scale) Side View not to scale --24 3/4"_ Design 35" Case Width_ 6" Overall (white (black Information Cutout dimensions, Width_ dispenser) dispenser) determined clearances panels must be used whenever 12 1/4" max 10-3/4" rnin and side panel sizes are by the many installation options available. will be exposed. Side panels are not required refrigerator is installed and oven cabinets.
Custom Panel Dimensions 36" Built-In Custom Door Panel Dimensions Using Standard Trim 1/4" thick panels or Panels secured to 1/4" thick backing ZISLIV36D ZISB36D (white (black Refrigerator dispenser) dispenser) mm Standard Trim with 1/4" Panels • 1/4" Panels: Cut panels to size. • Custom handles with 1/4" door panels require Freezer Panel Standard Dispenser ZKH1.
Custom Panel Dimensions 36" Built-In Custom Door Panel Dimensions ZISW36D ZISB36D Using Trim Kit ZKT36 (white (black Refrigerator dispenser) dispenser) 3/4" thick panel with standard handle and/or ZWCD1 custom collar trim • The ZKT36 trim kit provides for the installation of 3/4" custom door and grille panels, using the standard fulllength handle. Cut panels to size and install.
Custom Panel Dimensions 36" Built-In Custom Door Panel Dimensions ZISW36D ZISB36D Using Trim Kit ZKT36 (white (black Refrigerator dispenser) dispenser) 314" thick panel with custom handle and/or ZWCD1 custom collar trim • ZKT36 and ZKHT1 installed installation of 3/4" custom together provides for the door and grille panels, using a custom handle of your choice.
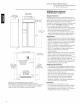
Custom Panel 36 Side Panel or Filler Options For All Dimensions " Built-In Monogram Refriserator Built.In Refrigerators (not to scale) Side panels must be used whenever the sides of the refrigerator will be exposed. -23 9/16"- 1/2" to 3/4" Side Panels 1/4" Side Panels Front. The front or Insert end of leading edge, must be finished to match side panel into trim. _24 3/4"_ Leading Edge Flush with Cabinet cabinetry.
Installation 36" Tools • Tinsnips to cut banding Required • Stepladder • 1-1/2" open-end • Bucket • Level Refrigerator • 7/16"open-end wrench • #2 Phillips screwdriver • Stubby Phillips screwdriver • Appliance Hand Truck • Tubing cutter wrench Built-In • Drill and appropriate bits • 7/16" socket with extension 3" for ratchet • Safety glasses Hardware Supplied • Special velcro adhesive • 1/4-1/4 union with nuts strips for 1/4" side • 1/4" panel foam spacers panels Materials Required Flo
Installation 36" Built_ln Refriserator Step 1 Remove Packaging Refrigerator is much heavier at the top than at the bottom - be careful when moving. When using a hand truck, handle from side only. Le refrigerateur est beaucoup plus Iourd en haut qu'en has. II faut etre prudent Iors des deplacements. Si un diable est utilise, il faut soulever le refrigerateur sur le cote seulement. • Remove outer carton. - Carefully cut banding at the top and bottom. • Slide out back corner posts (2).
Installation 36" Built-In Refrigerator Step 2.4 For Installations With A Reverse Osmosis System Only When connecting a GE Reverse Osmosis Water System to your refrigerator, the only approved installation is with a GE RVKIT. Lors du raccordement au refrigerateur du systeme GE de purification de I'eau par osmose inverse seule I'installation avec un ensemble GE RVKIT est z,t.SU Clockwise ,_, m,b To Remove approuvee.
Installation 36'" Step 4 Roll Refrigerator Into Opening The front is supported Level by leveling Refrigerator • To level the back of the refrigerator, nut located above the front wheels. Step 5 Refrigerator • Gently push refrigerator into opening with hands against front corners The cardboard protective pad should be beneath the refrigerator • Roll refrigerator into the opening until it is flush with adjacent cabinets All models have 4-point leveling.
Installation 36'" Step 7 OPTION Secure Built-In Refrigerator 1 ANTI-TIP PRECAUTIONS refrigerator at the top The refrigerator is heavy at the top and must be secured to prevent the possibility of tipping forward. PRECAUTIONS CONTRE LES BASCULEMENTS Le retrigerateur est beaucoup plus Iourd en haut et il faut le maintenir en place pour eviter la possibilite de son basculement vers I'avant.
Installation 36" Step 9 Connect power • Connect refrigerator grounded Built-In Refrigerator power cord plug to properly receptacle, accessible through the top right side of the grille opening. • Check to make sure power to refrigerator opening refrigerator is on by door to see if interior lights are / / on. Step Mount 10 Top Grille Panel If you are using 3/4" thick custom panels, SKIP THIS STEP See Custom Panel Dimensions for grille panel sizes.
ZKH1 Trim Kit (For Support Tools and materials These instructions required: Option 1--For • #2 1/4" for Custom Panels) H;_ndles are divided into 2 options: non-dispenser and dispenser models using custom collar trim. Phillips screwdriver Option 2--For dispenser model using the standard full-width trim. • Drill and appropriate bits • Custom door panels • Custom handles • Safety glasses Parts List: A.
ZKH1 Trim Kit (For Support Option for 1/4" Panels) Custom H;_nctles I Installation Step 2 Locate position of handles _.../Door Extrusion Min. lq/2" Max / Note: Handlemust be located 3/4" to 1ol/2" from edgeof extrusion. • Slide custom frames. panels into fresh food and freezer door the centerlines • Temporarily secure the new door extrusions doors. Use at least 2 screws on each door. • The handles must be located of the extrusion.
ZKH1 Trim Kit (For Support Option for 1/4" Custom Panels) H;_ndles 1 Installation Step 3 Assemble extrusion handle panel, and Screw _Extrusion Decorator_ DoorPanel Decorator Door _/ Panel / I 3/4"Min. 1-1/2"Max, Handle_l; / Door Handle-__ • Remove the door extrusions and door panels. • Drill 1/16" pilot hole through extrusion. • Drill clearance • Assemble handle. • Install screw(s) extrusion, holes through the panel and extrusion.
ZKH1 Trim Kit (For Support OPTION For 2 dispenser using trim full-width Step 1 Remove handles Step 2 Remove trim • Open door to 90°. Remove the screws model for 1/4" Custom Panels) H;_ndles from the full-length aluminum handle of the freezer door. • Retain screws, discard handle. Remove door panel trim above and below dispenser. Lift off dispenser trim. Retain screws and trim.
ZKH1 Trim Kit (For 1/4" Panels) Support Option for Custom H;_ndles 2 Installation • Drill clearance Step 4 Install custom the dispenser handle • Install screw(s) handle bracket, custom handle. holes through the handle bracket and trim. long enough to pass through dispenser the trim and into the Dispenser Trim HandleBracket / Note: The customhandle must I be installed against tile handle bracket.Tile customhandle cannot exceed11-3/4" length. _...
ZG2 Trim Kit GHlle FOR83",83-1/2" AND 84-1/2" INSTALLATION HEIGHTS • This kit provides optional original Panel Frame Ac[j't/stment side trim pieces for the grille frame to fit 83", 83-1/2" or 84-1/2" installation heights. To change grille panel size: • Determine the installation height by measuring the enclosure from the floor to the underside of soffit. When there is no soffit, measure to the top of adjacent cabinets. • Adjust refrigerator case trim to desired Production Installation. height.
ZKT36 Trim Kit 3/4" Custom Tools and materials These instructions required: Option 1--For Panel_ are divided into 2 options: non-dispenser and dispenser models using custom collar trim. • #2 Phillips screwdriver Option 2--For dispenser model using the standard full-width trim. • Stubby Phillips screwdriver • Drill and appropriate bits • Safety glasses • Custom panels Kit contents Parts list: FreezerDoor A. Toptrim B. Sidetrim C, Bottomtrim A c FreshFoodDoor D, Toptrim E. Sidetrim F.
ZKT36 Trim 3/4 OPTION 1 • Remove the Phillips head screws from the full-length handles. or • Open the doors fully to stop. dispenser model custom trim • Remove the screws from the aluminum Propels trim, top, bottom and hinge side. • Retain screws. Step 1 Remove handles " Custom • Open door to 90°. For non-dispenser model using collar Kit Discard original trim. & trim Note: If a customcollar is to Important: be used,order ZWCD1trim kit.
ZKT36 Trim Kit 3/4 Option " Custom P;mels 1 Installation Step 3 Apply panel support brackets BackSide DoorPanel_ Dimension A ZKT36-6-3/4" Dimension B ZKT367J/8" Bottom Edge Bottom Edge _-A B Freezer Panels • Position support bracket dimension on freezer panel, • Secure support brackets to the bottom of the panels A, from the hinge side edge. • Position support bracket dimension Fresh Food Panel with #4 screws on fresh food panel, B, from the hinge side edge. provided.
ZKT36 Trim Kit Option 3/4 " Custom P_nds Top Ca Tdm __s_ _ _l 1 Installation Step 5 Adjust The refrigerator grille panel height • Loosen 2 screws on both sides and raise the top case secured is shipped with the top case trim at the 83" refrigerator height. trim to meet soffit height, from 83" to 84-1/2". • Tighten all 4 screws. Important: .
ZKT36 Trim 3/4 OPTION For 2 dispenser model using full.width trim • Open freezer " Custom Pm_eI_ door to 90°. • Remove the Phillips head screws from the full-length handles. • Open door fully to stop. • Remove screws from the aluminum trim, top, bottom Step 1 Remove handles and hinge side. • Remove the trim above and below the dispenser. & trim • Retain screws original and full-length handles. Discard trim. • Attach the new 3/4"trim pieces at the top and hinge side using original screws.
ZKT36 Trim 3/4 Kit " Custonl Propels Step 4 Install panels ¢ z ¢ • Install the lower panel by slipping tabs into the slots on the underside of the dispenser trim. • Hold in position while fitting new bottom trim against the bottom of the door. Tabs should protrude through the bottom trim. • Install screws up through • Place the upper panel onto the top of the dispenser with tabs inserted into the slots. • Push the panel back against the steel door.
ZKHT1 Trim 3/4" Panels) Kit (For Support Tools and materials These instructions required: Option 1--For for Custom Hi, holies are divided into 2 options: non-dispenser and dispenser models using custom collar trim. #2 Phillips screwdriver Option 2--For dispenser model using the standard full-width trim.
ZKHT1 Trim Kit Support Step (For for Custom 3/4" Panels) H;_nctles 1 Temporarily mount door panels • Place the prepared 3/4"custom • Secure the panel to the trim temporarily door panels on the bottom trim with support bracket tabs inserted slots. into 2 screws through • Slide door extrusion • Push the panel back against the steel door, making Temporarily by driving the back side of the trim at the top. in between panel and steel door. secure with 2 screws.
ZKHT1 Trim Support Option For CIIStOlll 3/4" Panels) H;_ndles 1 Installation Step 3 Assemble extrusion and Kit (For handle panelr • Remove the door extrusions and door panels. • Drill 1/16" pilot hole through extrusion. • Drill clearance • Assemble handle. • Install screw(s) extrusion, holes through the panel and extrusion. the door panel, extrusions and custom long enough to pass through -- 3/4" Min. lq/2" Max, the door panel and into the handle. Step 4 Mount assembled panels ......
ZKHT1 Trim Kit Support Option Custom 3/4" Panels) Hi, holies I Installation OPTION For for (For 2 dispenser Note: Optimal final appearancedependson careful model using full-width routing depth. Do not exceed 1/4" routingdepth. trim 1 13/16" Back Side y_,_1/4" Max. _1-1 __ %ok Side _ .....................................................................
ZKHT1 Trim Kit (For Support Option Custom H:_nctles 2 Installation • Drill clearance Step 2 Install custom for 3/4" Panels) the dispenser handle holes through the handle bracket and trim. • Install screw(s) long enough to pass through the handle bracket, dispenser trim and into the custom handle. -DispenserTrim HandleBracket HandleBiacket DispenserTrim CustomHandle Step 3 Mount assembled dispenser trim • Mount assembled the door.
ZKHSS1 for 1/4" Panels Tubular This kit provides for the installation of Stainless Steel custom handles on 1/4" thick decorator door panels. The door extrusions allow these custom handles to be secured to the door structure, rather than to the custom panels, This kit contains all the necessary parts for dispenser and non-dispenser models. Stainless Steel [-[nz_ctles Note: It is best that 2 people install this kit.
ZKHSS1 for 1/4" Panels Tubular • Cut a piece of corrugated Step2: Match Handle to Stainless Steel [-[;_nctles to use as a pad to protect the panel finish. Use 1/2" thick section of plywood to Extrusions Handle protect flooring when drilling. Note: Besure to orient • Place custom panels on the pad, appearance down. side extrusions and handles correctly.
ZKHSSI for 1/4" Panels Tubular Step 2.4: If you are installing these handles onto Stainless Steel panels: Steel if you are drilling through steel panels. Stainless • Tape extrusions panels must be It will leave a permanent tive plastic covering dent. Do not remove protec- until final installation. • Place supplied filler panel (corrugated) on floor to use as a pad. down.
ZKHSS1 for 1/4" Tubulnr Panels Stainless Steel [-[nnctles Step 4A: Install Handles and Panels Handle StainlessPanel Corrugated For Stainless Panels: • Press foam pads against reduce thickness. steel doers to temporarily the extrusion. • Crimp top and bottom edges of corrugated. • Slide corrugated 1/4" gap between • Place a spacer ring over each of the 4 screw holes on onto doors, leave about edge of corrugated Use tape to hold in place. • Place extrusion and hinge side.
ZKHTSS1 for 3/4" Panels Tubulor This kit provides for the installation of Stainless Steel custom handles on 3/4" thick decorator door panels. The door extrusions allow these custom handles to be secured to the door structure, rather than to the custom panels. This kit contains all the necessary parts for dispenser and non-dispenser models.
ZKHTSS1 for 3/4" Panels Tubulor Step 1: Remove • Open doors to 90°. Remove the screws Stainless Steel [-[;_nctles from the full- length handles of both doors. • Retain screws, discard handles. Handles Note: If a custom collar is to be used, order ZWCD1 Trim Kit for 36" and 42" wide models. Order ZWCD2 for 48" wide models. Step 2: Match Handle to Panels • Cut a piece of corrugated Extrusions to use as a pad to protect the panel finish.
ZKHTSS1 for 3/4" panels Tubular Step 3: Install • Place a handle standoff Standoffs standoff to point to the floor. • Install set screws into the bottom of each standoff, onto Handles on each attachment Stainless provided. [-[;_nctles post along the handle. Position the screw hole on the using the Allen wrench Steel The standoff ( _Screw should be tight against the handle. Step 4: Install Handles • Start mounting through screws through the extrusion and just the custom panel.
ZKHTSS1 for 3/4" Panels Tubular Step 5 Install Assembled Panels (continued) For models with full width dispenser trim and 2 piece Stainless Steel H;mctles / freezer panels: It is best that 2 people perform • Carefully, lift the assembled this step. panel to the case trim. Hold both panels so they do not twist the extrustion. • Insert the support bracket tabs into the bottom trim. • Push and hold the panel back against the steel door. • Reinstall original screws into the door extrustion.
ZWCD1 Trim Kit Custonl Dispenser Collar Tools and materials required: • #2 Phillips screwdriver • Drill and appropriate bits • Custom door panels • Safety glasses Parts List: A. Collar trim Kit contents (Both black and white trim included) B B. Top bracket C. Bottom bracket D. Screws (2) This kit provides for the use of a custom dispenser collar trim, replacing full-width the standard trim. This kit can be used alone, or combined with one or all other trim kits.
ZWCD1 Trim Kit Custom Cut dispenser hole and rout The use of this custom collar trim requires door door panels must be routed on all 4 sides of the panel for dispenser dispenser be located Dispenser Collar that the hole and cut very accurately. 3/4" cutout. _[9 7/16"_ 7/8" 12 5/16" Rout the back side of the panel 1/4" deep and 7/8" wide, Wide Rout flush with the edge of the cutout. The Cutout is 9 7/16" wide by 12 5/16" high. 3/4" panels must be routed on all four sides of the cutout.
Note: While performing installations described in this book, safety glasses or goggles should be worn. To obtaB_ specific iz_foHnadon concesT_is2g asO+ MonQqs_un product oi"service, c+rdlGE Answer Cenger + consun+er i11fo17113HOllservice at 800. 6'26.2000 time, ct++yoi"n_+hg. ffOf Moll_1¥1111 TM aqf+ local serwce " m " .f+our m'ea, call 1 800 444 1845. Note: Product General specifications O improvement Electric.