
Owner`s manual


12
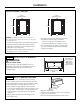
REMOVE ORIGINAL
DRAWER FRONT
• Remove the three screws from the bottom
of the drawer edge.
• Remove the four screws on the inside
of the drawer at the top. Retain all screws.
– Support the drawer front as you remove screws
to prevent the front panel from falling
.
BEFORE YOU BEGIN
Read these instructions completely and carefully.
• IMPORTANT– Save these instructions
for local inspector’s use. Observe all governing
codes and ordinances.
• Note to Installer – Be sure to leave these
instructions with the Consumer.
• Note to Consumer – Keep these instructions
for future reference.
Installation
Instructions
PROFESSIONAL STYLE PANEL
ACCESSORY KIT
ZXD30P
PARTS SUPPLIED
Stainless Steel Professional Style Drawer
Accessory
This kit contains a stainless steel professional style
panel with a handle and a lamp jewel imbedded
in the bottom right side. The tubular handle from
the original drawer front or a custom handle
cannot be installed on this panel.
IMPORTANT: The warming drawer should be
installed according to the installation instructions
packed with the product. The original drawer front
will be removed and replaced with a custom panel.
PREPARE DRAWER
FOR PANEL INSTALLATION
IMPORTANT: The drawer must be installed into
the cabinet before opening the drawer.
• Turn the warming drawer to “OFF.”
• Open the drawer approximately halfway.
INSTALL PANEL ONTO DRAWER
• Install the panel assembly to the exposed drawer
front using the original 7 screws.
REMOVE THE PACKAGING
• Open the carton and remove the panel.
Remove all protective covering on both sides.
CAUTION:
Keep all plastic material
away from babies and small children. Plastic could
pose a choking or suffocation hazard.
STEP 2
STEP 3
STEP 4
STEP 1
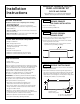
TOOL AND MATERIALS REQUIRED
• Phillips screwdriver