
Installation Instructions


18
Installation Instructions
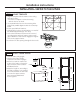
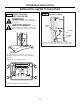
• Align the template with the marks on the ceiling
and tape in place.
– Be sure the template is oriented correctly
with the front of the hood.
• Use a plumb bob to be sure the mounting holes
will provide parallel alignment with the countertop
below.
• Center punch all hole locations.
• Drill pilot holes in the 4 screw locations. Use a 3/16″
bit and drill approximately 1-1/2″ deep.
• Drive 4 hex head wood screws into the center of
the ceiling joists and cross framing. Leave a 1/4″
gap to allow the screw head to engage the keyhole
slots on the support frames.
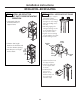
STEP 1 MOUNT TEMPLATE
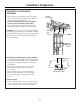
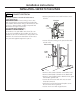
STEP 2 ADJUST FRAME HEIGHT
•Measure exact ceiling height.
•Find the exact frame height
required on the chart on page 6.
•Place the support on a work
surface. Remove 2 screws on each
of the 4 sides of the frame to
loosen the upper structure, lower
structure and blower/motor.
•Adjust the height “X”, according
to the chart on page 6.
•Use a marker pen to indicate
where screw holes should align
in the assembled upper, lower
and blower/motor pieces.
1/4" Gap
24″ min.
30″ max.
36″ min.
Frame
height
2-3/4″
Ceiling
height
X
49-80406
Printed in Italy 04-06 JR
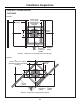
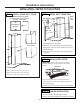
36″ Hood
Template
8-1/2″ Dia.
Cut a 1″ Dia.
Wire Access
Hole
Cut a 1″ Dia.
Wire Access
Hole
Drill 3/16″
Pilot Holes
Approx. 1-1/2″
Deep
Drill 3/16″
Pilot Holes
Approx. 1-1/2″
Deep
10-1/16″ to
Centerline
of Holes
7-1/16″ to
Centerline
of Holes
FRONT OF HOOD
7-1/16″ to
Centerline
of Holes
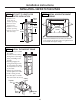
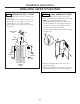
INSTALLATION—RECIRCULATING
NOTE: Do not cut the
duct opening shown
on the template for this
recirculating installation.
NOTE: Low ceilings may require that the
lower portion of the support frame be removed.
The upper support frame may be secured
directly to the blower/motor. Refer to the
chart on page 6 for your ceiling height and
to be sure the duct cover trim piece will fit.
Mark
each
piece to
indicate
where
screw
holes
align.