
Installation Instructions


7
Installation Preparation
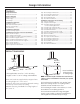
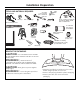
TOOLS AND MATERIALS REQUIRED
(NOT SUPPLIED)
Pencil and tape measure
Pliers
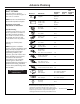
120V 60Hz. 15 or 20 Amp,
2-wire with ground. properly
grounded branch circuit.
Key hole saw
Wire cutter/stripper
Step ladder
Metal snips
Saber saw
or sawsall
Wire nuts
Phillips and flat blade
screwdrivers
Strain relief for
junction cover.
Spirit level
Flashlight
Safety glasses
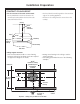
8″ round metal
duct, length to
suit installation.
Duct tape
3/8″ swivel
socket or pivoting
hex socket with 6″
extensions
Carpenter’s square
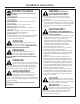
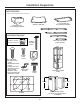
REMOVE THE PACKAGING
CAUTION: LIFT THE HOOD OUT OF THE BOX
BY THE CENTER METAL PORTION. DO NOT LIFT BY THE
GLASS SIDES.
PRUDENCE : LEVEZ LA HOTTE À
L’EXTÉRIEUR DE LA BOÎTE PAR LA PORTION MÉTAL
CENTRAL. NE LEVEZ PAS PAR LES CÔTÉS DE VERRE.
CAUTION: Wear gloves to protect against
sharp edges.
PRUDENCE : Portez des gants pour éviter
les blessures causées par les tranchants.
• Grasp the hood by the metal insert in the center
and lift straight up and out of the box.
• Remove and properly discard the plastic wrapping.
• Remove parts box, duct covers and other
packaging.
Hammer
Electric or battery-operated drill
and 3/16″ bits, Phillips and flat
blade screwdriver bits.