
User Manual
8
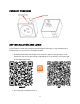
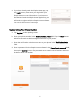
7. Tap the Change network link, then select the SmartLife-E8F0 entry and tap Connect
now to continue. The app will begin connecting to the Smart Plug.
8. Once the plug and the app are synchronized into the network, the app will inform
you that the device was successfully added. Tap Done to continue.
9. You will be left on the
Plug Details
screen.
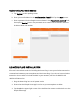
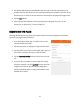
PLUG CONTROL SCREEN
Once you have the plug installed to the app and your network, it will be listed on the
Connected Devices
screen. You can control the plug in the following ways:
While on the
Connected Devices
screen, tap the power button on the plug entry to
turn it on or off.
If you tap the plug entry on the
Connected Devices
screen, the display will change
to the
Plug Details
screen, with a plug icon in the middle.
While on the
Plug Details
screen, you can tap the plug icon to turn the plug on or
off.
While on the
Plug Details
screen, tap the Schedule icon at the bottom of the screen
to display the
Schedule
screen. See the
SCHEDULING
section for more details on
scheduling.
While on the
Plug Details
screen, tap the Timer button at the bottom of the screen
to set the timer. See the
TIMER
section for more details.
While on the
Plug Details
screen, tap the Statistics button at the bottom of the
screen to display various electrical usage statistics.
While on the
Plug Details
screen, tap the three vertical dots in the upper right
corner to access the
Device Control
screen, which allows you to rename the
plug/device and remove the device from the network, as well as several other
options.
While on the
Plug Details
screen, tap the back arrow in the upper left corner or the
back button to return to the
Connected Devices
screen.