User Guide © 2011 Perception Digital Limited. All Rights Reserved.
User Guide CONTENTS INTRODUCTION .....................................................................................2 HOOK UP CABLES…………………………………………………………………………….....4 CONFIGURE YOUR VULKANO………………………………………………………………….7 USE YOUR VULKANO FEATURES…………………………………………………………….15 WATCH TV……………………………………………………………………………………….15 TV GUIDE…………………………………………………………………………………………16 MY RECORDINGS……………………………………………………………………………….19 INTERNET APPS………………………………………………………………………………….22 SETTINGS………………………………………………………………………………………….
User Guide INTRODUCTION Vulkano is a sleek and stylish consumer device that connects to your television STB (Set Top Box), and enables a complete television and Internet media experience on your Android , BlackBerry devices, iPhone, iPad, PC, Mac and big screen television. With simple and easy setup, Vulkano allows you to watch and control live TV from your mobile device via 3G or Wi-Fi. You can also schedule recording TV onto external storage and transfer files to watch at a time convenient to you.
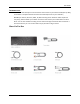
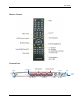
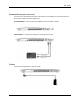
User Guide REMOTE CONTROL VULKANO UNIT HDMI Output IR Blaster Composite Input SD Video In / Audio In Composite Output SD Video Out / Audio Out HD Power Reset SD Card Aux USB Power Component Output HD Video Out Component Input SD Video In / Audio In 3 Ethernet HDD Data
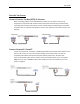
User Guide HOOK UP THE CABLES CONNECT YOUR SET TOP BOX (STB) TO VULKANO When connecting Vulkano to your STB (Satellite or Cable), you can either connect using Component or Composite video outputs located on the back of the STB. If your STB has both, use Component for better video quality. Connect the STB video and audio outputs to the video and audio inputs on the back of the Vulkano. Connect your Vulkano to your STB as shown in the diagrams.
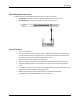
User Guide STORAGE OPTIONS (SOLD SEPARATELY) You have to connect Vulkano with either a SD memory card, USB disk or an external hard disk drive for Recording and Internet Application. SD Card/USB disk – Insert the SD card / USB disk into your Vulkano as shown. Hard Disk Drive – Connect your Vulkano to the Hard Disk as shown. POWER Connect the included power supply as shown.
User Guide HOME NETWORK CONNECTIONS Vulkano can work on your home network, whether it is Wi-Fi or Ethernet. If Using Wi-Fi – You do not have to do anything, we’ll take care of it for you If Using Ethernet – Connect your Vulkano to your router as shown START THE SETUP Turn on your television Use your television remote control to select the HDMI, Component or Composite input from the television setup or settings menu.
User Guide CONFIGURE YOUR VULKANO After switching on your Vulkano, the TV screen will be switched between composite/component/HDMI channels, the Get Started screen will be displayed on your television after around 10 seconds. If you have connected your Vulkano to your TV with the HDMI input: Press 1 on your Vulkano remote Note: Make sure you do not press OK. If you have connected your Vulkano to your TV with the Component input: Press OK on your Vulkano remote Note: Make sure you do not press “1”.
User Guide WIRELESS NETWORK If you connect your Vulkano to your router via Wi-Fi: 1. Select your wireless network 2. Press OK Use the Number buttons to enter your network password or router key. 1. Press OK Note: You can use the Left Arrow button on your Vulkano remote to backspace if you make a mistake Or Press to show the on-screen keyboard. Use the Arrow buttons 1. Press Done 2. Press OK A Network Configuration confirmation screen will be displayed.
User Guide VULKANO NAME You will need to give your Vulkano a name and password. This name and password will allow you to access your Vulkano from your PC or mobile device. Use the Number buttons on Vulkano remote: 1. Enter your Vulkano name. 2. Press OK Note: You can use the Left Arrow button on your Vulkano remote to backspace if you make a mistake Or Press to show the on-screen keyboard. Use the Arrow buttons on Vulkano remote 3. Press Done 4.
User Guide TV GUIDE CONFIGURATION (This function is only supported in USA and Canada currently) Please select: 1. Configure Guide or 2. Skip Guide configuration ( select this if you are not located in USA or Canada ) 3. Press OK ENTER ZIP CODE Using the Number buttons on your Vulkano remote: 4. Enter your zip code 5. Press OK Note: You can use the Left Arrow button on your Vulkano remote to backspace if you make a mistake. SELECT TV SERVICE Using the Arrow buttons on your Vulkano remote: 1.
User Guide DEVICE TYPES Using the Arrow buttons on your Vulkano remote: 1. Select your Device Type from the list 2. Press OK SELECT PACKAGE (S) Using the Arrow buttons on your Vulkano remote: 1. Select one or more package items 2. Press OK for each item you select 3. Select the Done selecting the package(s) option 4. Press OK SELECT STB MODEL Using the Arrow buttons on your Vulkano remote, 1.
User Guide To test the remote commands: 1. Press the CH+ and CH- buttons 2. Press OK Using the Arrow buttons on your Vulkano remote: Select It worked if the remote commands work Select It didn’t work if the remote commands failed, and follow the instructions Select Try again to test the remote commands again Select Continue anyway to skip the test and try again later Press OK REMOTE CONTROL Using the Arrow buttons on your Vulkano remote: 1.
User Guide Using the Arrow buttons on your Vulkano remote: Select It worked if the remote commands work Select It didn’t work if the remote commands failed, and follow the instructions Select Try again to test the remote commands again Select Continue anyway to skip the test and try again later Press OK CONFIGURE TIME ZONE Using the Arrow buttons on your Vulkano remote: 1. Select your time zone 2.
User Guide FORMAT DISK If it is the first time you set up Vulkano, your storage device needs to be formatted for Recording and Internet Apps. This will erase any existing data. Press Format my SD card to proceed with formatting the storage device (e.g. SD Card) Press Skip formatting to skip it ( only Watch TV and Guide will work ) CONFIRM FORMATTING Using the Number buttons on your Vulkano remote: 1. Enter the code number displayed on the screen 2. Press OK Disk formatting may take up to ten minutes.
User Guide USING YOUR VULKANO FEATURES This section covers the following: o Live TV o Guide o My Recordings o Internet Apps o Settings o Help Press OK to enter the features Press Menu to return to the main menu Press Back to return to the previous page WATCH TV To watch Live TV, you can: Use the Arrow buttons on your Vulkano remote to select the Live TV option from the Menu screen and press OK or Press TV on Vulkano remote A television picture will be displayed on your screen.
User Guide To record a program from Live TV: 1. Press to initiate a 30-minute recording of the program you are currently viewing 2. Press again and select Stop this recording to cancel the recording 3. Press Back or Stop to return to the Menu If you selected a Live TV channel from the Guide, the Back or Stop button will return you back to the Guide.
User Guide Schedule a recording To schedule a recording from the Guide: 1. Use the Arrow buttons on your Vulkano remote to select the program you wish to schedule 2. Press An information dialog box will be displayed.
User Guide Press OK Note: If you wish to free up available space, you can delete existing or scheduled recordings from the storage. For additional information, please refer to the My Recordings section. Recording a show from the Guide When viewing the Guide, the Red Circle Indicator is displayed for recordings that are currently in progress. The Orange Clock Indicator scheduled recordings. is displayed for Canceling a recording To cancel a recording in progress: 1.
User Guide Adding channels into favorite and search channels To add channels into favorite: 1. Use the Arrow buttons on your Vulkano remote to select the program 2. Press and use Arrow buttons to select Add to favorites To view your favorite channels: 1. Press and use Arrow buttons to select Favorites To search a channel: 1. Press and use Arrow buttons to select Search 2.
User Guide MY RECORDINGS To access My Recordings, you can: Press DVR or use the Arrow buttons on your Vulkano remote to select the My Recordings option from the Menu screen and press OK or Ready to watch Using the Arrow buttons on your Vulkano remote: 1. Select Ready to watch to view recordings that have been completed 2. Press OK The Ready to watch screen displays a list of programs that have already been recorded.
User Guide Scheduled Using the Arrow buttons on your Vulkano remote: 1. Select Scheduled to view scheduled recordings and recordings in progress 2. 3. Press OK The Scheduled screen displays a list of programs that are currently being recorded and are scheduled to be recorded. When viewing the Scheduled screen, you can: 1. Use the Arrow buttons on your Vulkano remote to select a recorded program 2.
User Guide INTERNET APPS To access Internet Apps, you can: Press Apps or use the Arrow buttons on your Vulkano remote to select the Internet Apps option and press OK or To access the Internet Apps > YouTube feature, you can: Use the Arrow buttons on your Vulkano remote to select YouTube Press OK The Internet Apps > YouTube feature contains the following options that can be accessed using the Arrow buttons on your Vulkano remote: Recently Featured Top Rated Most Viewed Top Favorited Search
User Guide To search for a specific YouTube video clip: 1. Use the Number buttons on your Vulkano remote to select the Search option 2. Or Press to show the on-screen keyboard. Use the Arrow buttons on Vulkano remote 3. Press Done 4. Press OK YouTube videos that fit your search parameters will be displayed. SETTINGS To view and adjust your settings, you can: 1. Use the Arrow buttons on your Vulkano remote to select the Internet Settings option from the Menu screen 2.
User Guide SETUP To go through the setup once again, you can: 1. Use the Arrow buttons on your Vulkano remote to select the Setup option 2. Press OK Troubleshooting For additional information or technical assistance for your Vulkano product, go to our technical Support Website at: http://www.3bayslife.com or http://www.myvulkano.com/support.html. ADVANCED SETUP To access the Advanced Setup, you can: 1. Use the Arrow buttons on your Vulkano remote to select the Advanced Setup option 2.
User Guide REBOOT The Reboot option allows you to restart Vulkano. To reboot your device: 1. Use the Arrow buttons on your Vulkano remote to select the Reboot option 2. Press OK Vulkano will restart and return you to the Menu screen. Note: It is recommended that you reboot your Vulkano after performing a Firmware Update. HELP To access the Help screen: 1. Use the Arrow button on your Vulkano remote to select the Help option 2. Select Vulkano TV Help 3.
User Guide FREQUENTLY ASKED QUESTIONS Q: I HAVE FORGOTTEN MY VULKANO PASSWORD. IS THERE ANY WAY TO RETRIEVE IT? A: You can retrieve the User Name and Password of your Vulkano from PlayerSettings.xml File of your Laptop. You may follow these Steps: For Windows XP Go to C:\Documents and Settings\User Account\Local Settings\Application Data\Monsoon Multimedia\Vulkano\PlayerSettings.xml For Vista & Win7 Go to C:\Users\\AppData\Local\Monsoon Multimedia\Vulkano\PlayerSettings.
User Guide Q: HOW CAN I CONNECT VULKANO TO TV ANTENNA? A: You may firstly connect TV antenna to an external STB, or DVR, then connect the STB or DVR to Vulkano via Composite or Component port Q: CAN THE VULKANO CONNECT WIRELESSLY TO THE WIRELESS NETWORK IN MY HOME OR MUST IT BE CONNECTED VIA ETHERNET CABLE? A: Vulkano comes with an 802.11n Standard built in Wireless chipset which makes it wireless capable.
User Guide This can be called (depending on the router): DHCP reservation Static DHCP Reserved IP address And requires you to enter both the IP address you wish to use and the MAC address of the device in question (Vulkano). See your router’s documentation for more information on this feature. Q: I CAN’T FIND MY STB FROM THE IR REMOTE LIST, WHAT SHOULD I DO? A: Vulkano has already covered the most common STBs in HK.
User Guide Release the button and let Vulkano boot. It will take around a minute. (During the reboot process Status of LED will be RED, Blinking Green then Off, Until it gets an IP Address, Once it will get an IP Address the LED will turn Green). Now Vulkano is in Factory Reset Mode and you can Reconfigure it for Local and Remote viewing. **Specifications are subject to change without notice *** Vulkano name and logo are trademarks of Monsoon Mulitimedia Inc.