
Replacement Part List


855-833-6483 OR EMAIL US AT INFO@MONSTERMOTO.COM!
PROBLEMS? DO NOT RETURN TO STORE! CALL US AT
8
TWO TOP RISERS
SLIGHTLY RAISED ON TOP
TWO BOTTOM RISERS
FLAT ON TOP
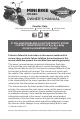
ATTACHING THE HANDLEBARS
1. Park your mini bike on a rm, level surface.
2. Locate the handlebar assembly hardware, which was included in the mini
bike parts bag.
BREAKING IN YOUR MINI BIKE
To protect your new engine, enjoy optimum performance, and extend the life of
the vehicle, break in your mini bike properly. To do this, avoid full throttle starts and
rapid acceleration for the rst fteen miles.
2. The diagram below illustrates how to attach the mini bike’s handlebars to
the mini bike.
BOLTS
THROTTLETHROTTLEBRAKE LEVER BRAKE LEVER
TOP RISERS
ASSEMBLED HANDLEBARSHOW TO ASSEMBLE
BOTTOM RISERS
NUTS
STEERING
COLUMN
MOUNTING
PLATE
FOUR NUTS
FOUR BOLTS
3. Once the handlebars are attached according to the diagram above, sit
on the mini bike to ensure the handlebars are in an appropriate position.
Tighten the bolts when you are comfortable with the placement of the
handlebars. Do not overtighten.
GETTING YOUR MINI BIKE READY TO RIDE
1. Remove the twine holding up the mini bike’s foot pegs.
2. Your mini bike will come with engine oil either already in the engine or in a
separate bottle included in the box. Check the engine oil level and add oil if
necessary. Do not ride the mini bike until the oil is at the appropriate level.
3. Add gasoline to the fuel tank.
4. Learn more about how to start, ride, stop, and store your mini bike in the
Basic Operation section of this manual.
AS VIEWED WHILE SITTING ON MINI BIKE SEATAS VIEWED WHILE SITTING ON MINI BIKE SEAT