37 inch Bluetooth Soundbar with Wireless Subwoofer MODEL: MSB3787W Please read this instruction manual carefully and keep it for future reference
CAUTION RISK OF ELECTRIC SHOCK DO NOT OPEN CAUTION: TO REDUCE THE ELECTRIC SHOCK, DO NOT REMOVE THE COVER (OR BACK). NO USER SERVICEABLE PART INSIDE, REFER SERVICING TO QUALIFIED SERVICE PERSONNEL. DANGEROUS VOLTAGE:The lighting flash with arrowhead symbol within an equilateral triangle is intended to alert the user to the presence of uninsulated “dangerous voltage” within the product’s enclosure that may be of sufficient magnitude to constitute a risk of electric shock to persons.
FCC NOTICE: This equipment has been tested and found to comply with the limits for a Class B digital device, pursuant to Part 15 of the FCC Rules. These limits are designed to provide reasonable protection against harmful interference in a residential installation. This equipment generates, uses and can radiate radio frequency energy and, if not installed and used in accordance with the instructions, may cause harmful interference to radio communications.
washbowl, kitchen sink, laundry tub, in a wet basement, or near a swimming pool. 6. Clean only with dry cloth The appliance should be cleaned only as recommended by the manufacturer. 7. Do not block any ventilation openings. Install in accordance with the manufacturer’s instructions. Slots and openings in the cabinet and in the back or bottom are provided for ventilation, to ensure reliable operation of the product and to protect it from overheating. These openings must not be blocked or covered.
moisture, does not operate normally, or has been dropped. 15. Power source This product should be operated only from the type of power source indicated on the marking label. If you are not sure of the type of power supply to your home, consult your appliance dealer or local power company. For products intended to operate from battery power, or other source, refer to the operation instructions. 16.
20. Service Do not attempt to service this product yourself as opening or removing covers may expose you to dangerous voltage or other hazards. Refer all servicing to qualified service personnel. 21. Replacement parts When replacement parts are required, be sure the service technician uses replacement parts specified by the manufacturer or those that have the same characteristics as the original parts. Unauthorized substitutions may result in fire or electric shock or other hazards. 22.
PROdUCT OvERvIEW FRONT VIEW 1 BOTTOM VIEW 3 2 3 3 CONTROL PANEL REAR PANEL 4 6 5 POWER SOURCE LINE IN USB L AUX IN R 7 DC OPT IN 8 24V SB PAIR 10 12 11 13 14 9 SUBWOOFER 15 INDICATOR 16 POWER INDICATOR STANDBY 18 19 17 1. Source Indicator 2. Remote Sensor 3. LED Light Effect 4. Power/Source Button 5. Volume Down Button 6. Volume Up Button 7. Previous Button 8. Next Button 9. SB Pair Button 10. LINE IN Jacks 11. AUX IN Jack 12. OPTICAL IN Jack 13. USB Port 14.
REMOTE CONTROL 1. 1 6 2 AUX OPTICAL 3 LINE IN USB 7 8 9 10 11 12 4 13 MUSIC TALK 5 (Power On/Off) Button 2. AUX Button 3. LINE IN Button 4. (Previous) Button 5. Sound Mode (MUSIC, TALK, MOVIE, STANDARD) 6. (Mute) Button 7. (Light Effect) Button 8. (Bluetooth)Button 9. OPTICAL Button MOVIE 10. Sound Mode STANDARD (Mode Switch) Button 11. USB Button VOL 14 12. (Next) Button 13. Play/Pause Button 14.
BATTERY PRECAUTIONS Follow these precautions when using a battery in this device: 1. Use only the size and type of battery specified. 2. Be sure to follow the correct polarity when installing the battery as indicated in the battery compartment, a reserved battery may cause damage to the device. 3. Do not mix different types of batteries together ( e.g: Alkaline and Carbon -zinc ) or old batteries with fresh ones. 4.
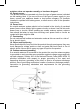
PLACEMENT AND MOUNTING 1. Placing the device on a table - Ventilation When placing the unit and the subwoofer on an entertainment center, bookshelf, or any type of enclosed space, be sure to allow enough space for ventilation. Otherwise, the heat generated will produce potential heat hazard. 2-3inches 2-3inches POW ER SOU RCE 2-3inches 2-3inches SB PAIR 2. The Installation Distance 873mm(34.
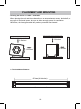
2.1 Mounting to a wooden wall 34. 4 in che s (screws not included) A. Mark the position of the mounting screws on the wall using a pencil. B. Drill the screws directly into the marks that you have made on the wall and leave approx. 0.3 inches length to hook the sound bar. C. Put the sound bar onto the mounting screws. Make sure they are firm and stable. 2.2 Mounting to a brick wall 34. 4 in che s (screws and plastic fixing plug are not included) A.
GENERAL OPERATION 1.Connect the DC 24V,2A Adapter to the DC IN jack on the Unit. Plug the Adapter into the AC outlet with AC110~240V;50/60Hz. The mode indicator on the Unit will light up and turn RED. 2. Connect the DC 24V, 2A Adapter to the DC IN jack on the subwoofer. Plug the Adapter into the AC outlet with AC110~240V;50/60Hz. The power indicator on the subwoofer will light up and turn RED. 3. Press and hold the Power/Soure button on the unit or press the button on remote control to power on the unit.
GENERAL OPERATION 6. During Playback: ~ Press the + or - button on the unit or remote control repeatedly to adjust volume. ~ Press the button on remote control to turn off sound, the mode indicator on the unit w ill blink, press the button again to resume. ~ Press the MUSIC button on remote control to turn to MUSIC sound effect mode. ~ Press the TALK button on remote control to turn to TALK sound effect mode. ~ Press the MOVIE button on remote control to turn to MOVIE sound effect mode.
BLUETOOTH OPERATION 1. Power on the unit and subwoofer and pair as previously explained. 2. Press the Power/Source button on the unit or the button on the remote control repeatedly, or press the button on remote control to switch to the Bluetooth mode, the indicator on front of the unit will turn Blue and blink. 3. Power on the external Bluetooth enable device and enter Bluetooth mode and try searching the unit. 4. When MONSTER SB1 appears, select it and make connection. 5.
AUX IN OPERATION An external Audio player(such as mobile phone, MP3 player etc.) can be connected to this unit and listen through the unit's speakers. 1. Plug one end of the AUX IN Cable into the AUX IN jack on the unit. 2. Plug another end of the AUX IN Cable into the headphone jack or Aux Out jack on the external audio player.
LINE IN OPERATION An external Audio/Video player(such as TV, DVD player etc.) can be connected to this unit and listen through the unit's speakers. 1. Plug one end of the line in cable into the LINE IN jacks(L&R) on the unit. 2. Plug the other end of the line in cable into the Line Out jacks(L&R) on TV or DVD player etc. white LINE IN USB L Rear View AUX IN R DC OPT IN 24V red Line out jacks of TV/DVD player etc. L R Video 3. Power on the unit and subwoofer and pair as previously explained.
OPTICAL-IN OPERATION 1. Connect the Optical out jack from the external audio player (such as TV, DVD player etc.) to the OPTICAL IN jack on the rear of the unit with the optical connection cable as illustated below:(For PCM format only) LINE IN USB L Rear View AUX IN R OPT IN DC 24V Optical Connection Cable TV or DVD player etc. OPTICAL OUT 2. Power on the unit and subwoofer and pair as previously explained. 3.
USB PLAYBACk 1. Plug the USB player to the USB port at the rear panel of the unit. LINE IN USB L Rear View AUX IN R DC OPT IN 24V USB 2. Power on the unit and subwoofer and pair as previously explained. 3. Press the Power/Source button on the unit or the button on the remote control repeatedly, or press the USB button on remote control to switch to the USB mode, the indicator on front of the unit will turn Indigo(blue+green). 4.
TROUBLESHOOTING SYMPTOM No power POSSIBLE CAUSE The adapter is not connected POSSIBLE SOLUTION Connect the adapter to the unit and wall outlet The unit is in power off mode Press and hold the power/source button on the unit or press the button on remote control to power on the unit No sound or sound weak Volume level in minimum position Raise the volume level by pressing the + Button on the unit Or press VOL+ button on remote control The paired/connected device is not in playback mode Play music/
SPECIFICATIONS Power input ...........................................................................AC 100~240V, 50/60Hz Power output .........................................................................DC 24V 2A Audio output of the unit...............................................................................4 x 12.5W Audio output of the subwoofer.............................................................................50W Bluetooth effective working range in open area........................
To make a warranty claim, do not return this product to the store. Please email support@curtiscs.com or call 1-800-968-9853. 90 day Warranty This product is warranted to be free from defects in material and workmanship for a period of ninety (90) days from the date of original purchase. During this period, your exclusive remedy is repair or replacement of this product or component found to be defective, at our option; however, you are responsible for all costs associated with returning the product to us.
Barre de son Bluetooth 37 pouces avec caisson de basses sans fil MODÈLE : MSB3787W Veuillez lire ce mode d'emploi avec attention et conservez-le pour référence future.
INSTRUCTIONS DE SÉCURITÉ IMPORTANTES ATTENTION RISQUE DE CHOC ELECTRIQUE NE PAS OUVRIR ATTENTION : AFIN DE RÉDUIRE TOUT RISQUE DE CHOC ÉLECTRIQUE, NE PAS RETIRER LE BOITIER (NI LA PARTIE ARRIÈRE). L'APPAREIL NE COMPORTE AUCUNE PIÈCE REMPLAÇABLE PAR L'UTILISATEUR, CONTACTEZ LE PERSONNEL QUALIFIÉ POUR RECEVOIR DE L'ASSISTANCE.
AVIS DE LA FCC : Cet équipement à été testé et est conforme aux limites d'un appareil de Classe B, selon l'article 15 des Règles FCC. Ces limites ont étés mises en place pour offrir une protection raisonnable contre les interférences dans un complexe résidentiel. Cet équipement génère, utilise et contient de l'énergie de fréquence radio, si inutilisé incorrectement pourrait créer des interférences dangereuses pour les communications radio.
ouvertures ne doivent pas être bloquées ou couvertes. Les ouvertures ne doivent jamais être bloquées en plaçant le produit sur un lit, un canapé, un tapis ou toute autre surface similaire. Ce produit ne doit jamais être placé près ou sur un radiateur ou une source de chaleur. Ce produit ne devrait pas être placé dans une installation assemblée comme une bibliothèque ou une étagère à moins qu'une ventilation adéquate ne soit présente ou que les instructions du fabricant soient respectées. 8.
17. Surcharge Ne pas surcharger les prises murales et les rallonges, car cela pourrait entraîner un risque d'incendie ou de choc électrique. 18. Insertion d'objet ou de liquide Ne jamais insérer d'objet dans le produit à travers les ouvertures car il pourrait toucher des points de tensions dangereux ou faire court-circuiter des pièces, ce qui pourrait causer des feux ou chocs électriques. Ne jamais verser ou pulvériser tout type de liquide sur le produit. 19.
23. Montage au mur ou au plafond Ce produit devrait être monté au mur ou au plafond seulement si recommandé par le fabricant. 24. Dommage nécessitant une réparation Débrancher le produit de la prise murale et confier la réparation à un technicien qualifié si une des conditions suivantes est rencontrée. a) Lorsque le cordon d'alimentation ou la fiche est endommagée. b) Si du liquide a été renversé ou des objets sont tombés sur le produit. c) Si le produit a été exposé à la pluie ou à de l'eau.
PR SENTATION G N RALE DU PRODUIT VUE AVANT 1 2 VUE DU DESSOUS 3 3 3 PANNEAU DE CONTRÔLE PANNEAU ARRIÈRE 4 6 5 POWER SOURCE LINE IN USB L AUX IN R 7 DC OPT IN 8 24V SB PAIR 10 12 11 13 14 9 CAISSON DE BASSES 15 INDICATOR 16 17 1. Indicateur de source 2. Capteur de la télécommande 3. Effets lumineux LED 4. Bouton Veille/Source 5. Bouton réduction du volume 6. Bouton augmentation du volume POWER INDICATOR STANDBY 18 19 7. Bouton Précédent 8. Bouton Suivant 9.
TÉLÉCOMMANDE 1 6 2 AUX OPTICAL 3 LINE IN USB 7 8 9 10 11 12 4 13 MUSIC 5 TALK MOVIE Sound Mode STANDARD VOL 14 1. Bouton (Marche/Arrêt) 8. Bouton (Bluetooth) 2. Bouton AUX 9. Bouton OPTIQUE 3. Bouton ENTRÉE LIGNE 10. Bouton 4. Bouton (Sélection de mode) 11. Bouton USB (Précédent) 5. Mode son (MUSIQUE, VOIX, FILM, STANDARD) 12. Bouton (Suivant) 6. Bouton (Muet) 13. Bouton (Lecture/ Pause) 7. Bouton (Effets lumineux) 14.
INSTALLATION DE LA PILE DANS LA TÉLÉCOMMANDE Première utilisation Retirez et jetez la languette d’isolation, comme illustré dans la Fig. 1. Fig.1 Remplacer la pile pour la télécommande 1. Sortez le support de la pile, comme illustré dans la Fig. 2. 2. Remplacez l’ancienne pile-bouton par une nouvelle pile-bouton de type CR2025, le symbole de polarité vers le haut, comme illustré dans la Fig. 3. 3. Remettez le support de la pile en place, comme illustré dans la Fig. 4. Fig.3 Fig.
AVERTISSEMENT ! Les piles-bouton peuvent causer des blessures graves, et même la mort en cas d’ingestion. Éliminez-les dans le respect des consignes ! Rangez les piles hors de portée des enfants ! ATTENTION Risque d’explosion si la pile est incorrectement remplacée. Remplacez-la seulement par une pile d’un type identique ou équivalent. Portée de fonctionnement de la télécommande L’unité peut ne pas fonctionner correctement si un obstacle se trouve entre l’unité et le transmetteur.
POSITIONNEMENT ET MONTAGE 1. Positionner l’appareil sur une table - Ventilation Lorsque vous placez l’unité et le caisson de basses sur un centre multimédia, une étagère ou un autre type d’espace clôt, assurez-vous de ménager un espace suffisant pour la ventilation. Sinon, la chaleur générée peut causer des risques d’incendie. 2-3 pouces (5 à 8 cm) 2-3 pouces (5 à 8 cm) POW ER SOU RCE SB PAIR 2-3 pouces (5 à 8 cm) 2-3 pouces (5 à 8 cm) 2. Distance d’installation 873 mm (34,4 pouces) 2.
2.2 Montage sur un mur de briques 34. 4 in che s (vis et chevilles de fixation non incluses) A. Marquez la position des vis de montage sur le mur à l’aide d’un crayon. B. Percez 2 trous sur le mur avec une perceuse puissante. C. Insérez les chevilles et enfoncez-les avec un marteau dans les trous. D. Vissez les vis dans les chevilles et laissez un espace libre d’environ 0,3 pouce (7 mm) entre la tête de vis et le mur pour suspendre la barre-son. E. Suspendez la barre-son sur les vis de montage.
UTILISATION GÉNÉRALE 1. Branchez l’adaptateur CC 24 V, 2 A dans le jack alimentation secteur de l’unité principale. Branchez l’adaptateur à une prise murale délivrant un courant de type CA 110~240 V; 50/60 Hz. L’indicateur de mode sur l’unité principale s’illumine en ROUGE. 2. Branchez l’adaptateur CC 24 V, 2 A dans le jack alimentation secteur du caisson de basses. Branchez l’adaptateur à une prise murale délivrant un courant de type CA 110~240 V; 50/60 Hz.
6. Pendant la lecture : ~ Appuyez sur le bouton + ou - de manière répétée sur l’unité pour régler le volume. ~ Appuyez sur le bouton sur la télécommande pour couper le son. L’indicateur de mode sur l’unité principale clignote. Appuyez de nouveau pour rétablir le son. ~ Appuyez sur le bouton MUSIQUE sur la télécommande pour activer le mode MUSIQUE. ~ Appuyez sur le bouton VOIX sur la télécommande pour activer le mode VOIX. ~ Appuyez sur le bouton FILM sur la télécommande pour activer le mode FILM.
FONCTION BLUETOOTH 1. Allumez l’unité principale et le caisson de basses, et associez-les comme décrit ci-dessus. 2. Appuyez sur le bouton Alimentation/Source sur l’unité ou sur le bouton de manière répétée, ou appuyez sur le bouton la télécommande directement pour activer le mode Bluetooth. L’indicateur Bluetooth sur le devant de l’unité clignote en bleu. 3. Allumez l’appareil Bluetooth externe, et activez le mode Bluetooth. Lancez une recherche de l’unité. 4.
FONCTION ENTRÉE AUX Vous pouvez connecter un lecteur audio (comme téléphone mobile, un lecteur MP3, etc.) à l’unité et en diffuser le son depuis les hauts-parleurs de l’unité. 1. Branchez une extrémité du câble ENTRÉE AUX dans le jack ENTRÉE AUX de l'unité. 2. Branchez l’autre extrémité du câble ENTRÉE AUX dans le port écouteurs ou Sortie Aux du lecteur externe.
UTILISATION DU MODE ENTRÉE LIGNE Vous pouvez connecter un lecteur audio/vidéo externe (comme un téléviseur, un lecteur DVD, etc.) à l’unité et en diffuser le son depuis les hauts-parleurs de l’unité. 1. Branchez une extrémité du câble entrée ligne dans les jacks ENTRÉE LIGNE (G et D) de l'unité. 2. Branchez l’autre extrémité du câble entrée ligne dans les jacks ENTRÉE LIGNE (G/D) du téléviseur, du lecteur DVD, etc.
UTILISATION DU MODE OPTIQUE 1. Connectez le jack de sortie optique du lecteur externe (comme un téléviseur, un lecteur DVD, etc.) au jack ENTRÉE OPTIQUE sur l’arrière de l’unité avec le câble de connexion optique, comme illustré ci-dessous : (pour format PCM seulement). LINE IN USB L Vue arrière AUX IN R OPT IN DC 24V Câble de connexion optique Téléviseur, lecteur DVD, etc. OPTICAL OUT 2. Allumez l’unité principale et le caisson de basses, et associez-les comme décrit ci-dessus. 3.
LECTURE DEPUIS USB 1. Branchez le lecteur USB au port USB situé sur le panneau arrière de l’unité. LINE IN USB L Vue arrière AUX IN R DC OPT IN 24V USB 2. Allumez l’unité principale et le caisson de basses, et associez-les comme décrit ci-dessus. 3. Appuyez sur le bouton Alimentation/Source sur l’unité ou sur le bouton sur la télécommande de manière répétée ou appuyez sur le bouton USB de la télécommande directement pour activer le mode USB.
DÉPANNAGE PROBLÈME Pas d’alimentation CAUSE POSSIBLE SOLUTION POSSIBLE L’adaptateur secteur n’est pas branché. Branchez l’adaptateur à l’unité et à la prise murale. L’unité est éteinte. Maintenez le bouton Alimentation/Source appuyé sur l’unité ou appuyez sur le bouton sur la télécommande pour allumer l’unité. Pas de son, ou volume très bas Le niveau de volume est au minimum. Augmentez le volume en appuyant sur le bouton Vol+ sur l’unité ou sur le bouton VOL+ sur la télécommande.
CARACTÉRISTIQUES TECHNIQUES Alimentation.............................................................................................CA 100~240 V, 50/60 Hz Source d’alimentation .....................................................................CC 24 V 2A Puissance audio de l’unité............................................................................................4 x 12,5 W Puissance audio du caisson de basses.................................................................................
Pour faire une demande de garantie, ne retournez pas ce produit au magasin. Veuillez envoyer un courriel électronique à support@curtiscs.com ou appeler le 1-800-968-9853. 90 jours de garantie Ce produit est garanti contre tout défaut de matériel et de fabrication pendant une période de quatre-vingt-dix (90) jours à compter de la date d'achat d'origine.
This device complies with Industry Canada RSS standard(s). Operation is subject to the following two conditions: (1) this device may not cause interference, and (2) this device must accept any interference, including interference that may cause undesired operation of the device. Le présent appareil est conforme aux CNR d'Industrie Canada applicables aux appareils radio exempts de licence.