
User Manual


Owner’s manual | Earth118
14
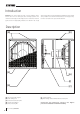
Connection examples
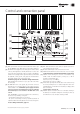
EXAMPLE C: 1 Earth118 + 2 self-powered loudspeakers
This is a more complex configuration which enables selective
enhancement of the low-frequencies (for example, only on drums
and keyboards, not on voices or brasses).
Note: it is advisable to place the subwoofer in the center,
between the two self-powered loudspeakers.
mixer 'AUX' output
➔
subwoofer 'R' input
mixer L / R outputs
➔
inputs of the two self-powered loudspeakers
❯❯❯ See connection example C, page 22
• Connect the AUXILIARY output of the mixer to the 'R' input [3]
of the subwoofer.
• Connect the L and R outputs of the mixer to the inputs of the two
self-powered loudspeakers respectively.
• This type of set-up allows you to use the subwoofer to extend the
low frequency response of only those instruments that really need it
(e.g. drum machines, bass, keyboards). These instruments are selected
by means of the AUX send controls on the corresponding channels.
The subwoofer's volume control and the mixer's AUX output level
control adjust only the very low frequencies.
EXAMPLE D: parallel connection of two or more Earth118
mixer L / R outputs
➔
L / R inputs of the first subwoofer
L / R outputs of the first subwoofer
➔
L / R inputs of the second
subwoofer
❯❯❯ See connection example D, page 22
• Connect the L and R outputs of the mixer to the L and R inputs
[3] of the subwoofer.
• Connect the 'LINK' L and R outputs [4] of the subwoofer to the
L and R inputs [3] of the second subwoofer.
The very low frequency range reproduced by a subwoofer is essentially
omnidirectional, thus allowing easy installation of the enclosure. In
most cases the subwoofer can be placed near the satellite loudspeaker
system, but when space or set up reason dictate it, the subwoofer can
be positioned at some distance from the satellite system (e.g.: under the
stage oor). You must always consider that the extended low frequency
range increases the risk of acoustic feedback, with undesired 'howls'
and reduced clarity. It is thus essential to place the subwoofer on a
rigid structure, that does not transmit vibrations to the microphones.
Some connection examples – among the most common possible
configurations are described below and also illustrated on pages 21
and 22 of this manual.
❯
Always make sure to use only heavy gauge, high quality
shielded cables.
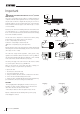
EXAMPLE A: 1 Earth118 + 2 self-powered loudspeakers
The complex connections that most other systems require for this
configuration are made extremely simple with this subwoofer thanks
to the L/R outputs of the built-in stereo electronic cross-over.
Note: it is advisable to place the subwoofer in the center, between
the two self-powered loudspeakers.
This set-up allows them to benefit from the increase in dynamic range
provided by the electronic crossover of the subwoofer.
mixer L / R outputs
➔
subwoofer L / R inputs
subwoofer 'x-over' L / R outputs
➔
inputs of the 2 self-powered
loudspeakers.
❯❯❯ See connection example A, page 21.
• Connect the L and R outputs of the mixer to the L and R inputs [3]
of the subwoofer.
• Connect the X-OVER L and R outputs [2] of the subwoofer to the
inputs of the 2 self-powered loudspeakers.
• The output levels of the two self-powered loudspeakers are not
affected by the 'VOLUME' control [6] of the subwoofer.
EXAMPLE B: 2 Earth118 + 2 self-powered loudspeakers
This is the most typical configuration where each subwoofer drives
one self-powered loudspeaker.
mixer L / R outputs
➔
'R' inputs of the two subwoofers
x-over 'R' outputs of the 2 subwoofers
➔
inputs of the 2 self-powered
loudspeakers.
❯❯❯ See connection example B, page 21.
• Connect the L and R outputs of the mixer to the 'R' inputs [3] of
the two subwoofers.
• Connect the X-OVER 'R' outputs [2] of the two subwoofers to the
inputs of the two self-powered loudspeakers.
• The output levels of the self-powered loudspeakers are not affected
by the 'VOLUME' control [6] of the subwoofers.