
Installation Guide


4
© 2018 Monte Carlo Fan Company
04/2018
7 8 9
10 11 12
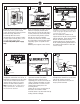
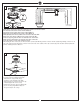
Place downrod over canopy, canopy ring
and yoke cover.
Thread lead wires and safety cable from
motor assembly through downrod.
For easy installation of cross ping on next
step.
Carefully insert a phillips screwdriver through
yoke and downrod (don’t damage the lead
wires) as a guide and then push the cross
pin and pull the screwdriver in the meantime
as shown in illustration.
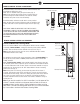
Slip downrod into motor yoke, aligning
holes and install cross pin and keeper pin.
Insert cross pin through yoke and downrod
until point appears on the other side, and
insert keeper pin on cross pin.
Pull the downrod up tight against the
cross pin, and then evenly tighten the
downrod set screws on motor housing
yoke.
Place yoke cover on top housing of fan.
Warning: Cross pin and keeper pin must
be installed securely, failure to install them
will result in serious injury.
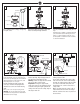
Install ball end of downrod into mounting
bracket opening. Align (engage) slot on
ball with tab on mounting bracket.
Warning: Failure to align slot on ball with
tab may result in serious injury.
Important: If using the angle mount,
make sure open end of mounting bracket
is installed facing the higher point of the
ceiling and make sure the ceiling angle is
not steeper than 15º.
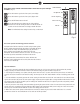
Connect the safety cable from fan to the
Ceiling support cable.
Slide cable clamp onto the safety cable
from fan. Place the end of cable through
the loop of ceiling support cable and then
feed end of cable into clamp hole and
firmly tighten set screw. Cut off excess
safety cable.
Make sure that when the safety cable is
fully extended the lead wires are longer
than the cable and no stress is placed on
the lead wires.
Attach Safety
Cable to Ceiling
Support Cable
Tab
Safety cable from fan
Cable clamp
Set screw
Cross pin
Screwdriver
Cross pin
Keeper pin
Canopy
Canopy ring
Yoke cover
Downrod
Hanger ball
Mounting bracket
Setscrew
Tab
Slot