
Installation Guide


5
© 2013 Monte Carlo Fan Company
11/15/2013
13
14 15 16
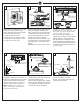
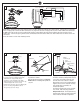
Make wiring connections using plugs with lead wires and wire connectors provided as indicated above. Connect the 2 P plug from
fan to 2 P plug from receiver and then connect the 3 P plug from fan to the 3 P plug from receiver. Connect White wire from house
to White wire from remote receiver marked AC N and then connect Black wire from house to Black wire from remote receiver
marked AC L. Connect all green grounded wires to Grounded wire from House. Make sure that no filaments are outside of the wire
connectors.
Insert the remote receiver into mounting bracket.
Raise canopy to mounting bracket, aligning
loosened screws in mounting bracket with
slotted holes in canopy. Twist canopy
clockwise to lock. Reinstall screws (with
washers) that were previously removed in step
3 and then tighten all screw securely.
Install canopy ring onto canopy by aligning the
grooves in canopy ring with the tabs on
canopy and pop it onto canopy.
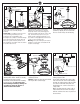
Insert the blade kit and blade rubber plug
in position as shown.
Hold the blade kit by finger and flip the
blade over for installing with flywheel in
step 16.
Engage the blade with flywheel, aligning
the holes and then partially install 2 blade
set screws and washers from top and
one bolt from side of blade as shown.
Repeat this process for remaining blades.
Tighten all set screws and bolts securely
after all the blade assemblies are
installed to flywheel.
Stuff plugs into the hole on side of blade.
Set screws, bolts and plugs provided.
Helpful hint: Make small adjustment by
moving blade a little may help to align the
holes on blade with holes on flywheel.
Flywheel
Blade Rubber
Plug
Fiber
Washer (6)
Blade
Setscrew (6)
Bolt (3)
Plug
Blade Kit
Blade
Blade Rubber
Plug
Blade Kit
Canopy ring
Green or Bare Ground
Green or Bare Ground
Green From Hanger Ball
Green From Mounting Bracket
White- AC IN N
Black- AC IN L
120V Supply
(Power Supply)
Wall Switch
2P plug
3P plug
Receiver
Receiver
Mounting bracket
Canopy
Tab
Groove