
Installation Guide


5
© 2013 Monte Carlo Fan Company
8/1/2013
Installation Instruction (Flushmount)
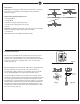
Remove canopy cover by turning counterclockwise. There are 6 holes
on the bottom of the canopy, 3 of them are larger. (Fig. 5)
Thread lead wires and safety cable through canopy. Place canopy over
yoke, aligning larger holes in canopy with the 3 existing screws on top
of motor housing. Install 3 screws with lock washers (these screws
with lock washers will be located in the hardware pack) into the
remaining holes. Tighten all screws securely. (Fig. 5-1)
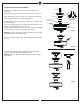
Install 4 x 25 watt candelabra base bulbs (25W Max), Bulbs included.
(Fig. 5-2)
To prepare the fan for wiring, hang fan onto mounting bracket by
sliding the canopy over the mounting bracket hook (Use one of
non-slotted holes on the rim of the canopy). (Fig. 5-3)
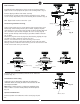
Safety Cable Installation
For Canadian installation and for USA fan and light kit combinations
over 35 lbs, in both flush and downrod modes the safety cable must
be installed into the house structure beams using 3” lag screws,
washers and lock washers provided. Make sure that when the safety
cable is fully extended the lead wires are longer than the cable and no
stress is placed on the lead wires. (Fig. 6)
Note: If Installing The Secondary Support Safety Cable in the U.S., Do Not
Remove Knockouts In The Outlet Box.
SAFETY CABLE INSTALLATION
Lag screw
Safety cable
Washer
Lock washer
Fig. 6
Fig. 5
Fig. 5-1
Fig. 5-2
Fig. 5-3
yoke
Canopy
Screws
Canopy
Hook
Lead wires and
Safety cable
電容器
電容器
電容器
Bulb
Canopy cover