
Installation Guide


2
© 2013 Monte Carlo Fan Company
9/25/2013
General Guide
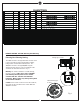
This remote controller operates with 3V CR2032 battery (battery included).
Store the remote controller away from excess heat or humidity
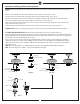
Make sure the fan is set on HIGH speed and the light is in the ON position by pull chain
controls originally supplied with your fan.
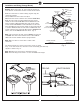
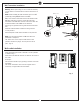
For downrod mount fans- Remove Ceiling fan CANOPY from its mounting bracket and
disconnect existing wiring for Remote control receiver installation and wiring. Replace it
after installation.
For Flush mount fans- Remove Ceiling fan housing or mounting bracket from mounting
plate and disconnect existing wiring for Remote controller receiver installation and wiring.
Replace it after installation.
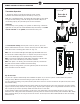
Warning: Before proceeding, be sure to shut off electricity at main switch or circuit breaker in
order to avoid electrical shock.
Note
: Fan installation must be complete including assembly of blades before testing remote
control unit.
Note: Refer to your Ceiling fan instruction manual for Safety and installation instruction.
This remote controller is to be used for the control of ceiling fan only, and in an AC 120V
60HZ power supply only.
The power supply to the remote control receiver should be connected through a switch, i.e.
existing wall switch.
Do not use the remote controller with SOLID-STATE fans.
Do not use the remote controller with outdoor fans.
Customer Service
800-969-3347
Customer Service Center
7400 Linder Ave.
Skokie, IL 60077
www.montecarlofans.com