
Installation Guide


5
© 2013 Monte Carlo Fan Company
9/25/2013
Installation and Wiring (Switch Housing Mount)
Warning: Before proceeding, be sure to shut off electricity at main switch or circuit breaker in order to avoid electrical
shock.
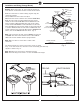
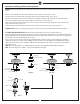
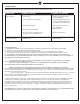
Remove switch housing from fan by unscrewing the 4 side mount screws. Keep the screws.
Disconnect plugs in switch housing by pushing down on tab and pulling the plugs apart. (Fig. 4)
Align the central hole of remote receiver with the hole (with plug) in the New switch housing and attach the remote
receiver onto switch housing by preadhered double-sided foam tap as shown. (Fig.4-1)
Connect the plug from fan to the plug from receiver (receiver with switch housing), aligning the clasp and make sure
plugs connected securely. (Fig. 4-2)
Install the switch housing onto the fan with the 4 side mount screws which were just removed. (Fig.4-2)
Helpful hint
: Keep wires and plugs away from the capacitor may make it easier for switch housing installation.
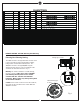
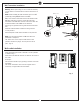
If install light kit with the fan
, Remove switch housing from fan if it is preassembled on the fan.
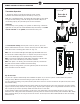
Remove tap from New switch housing. Remove hex nut and lock washer from light fixture and then Install the New switch
housing onto light fixture by turning clockwise till tight. Place the lock washer and hex nut over lead wires and tighten the
hex nut on the thread rod of light fixture. (Fig.4, Fig.5)
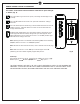
Place receiver over lead wires and thread pipe from light fixture and stick receiver on switch housing by preadhered
double-sided foam tap as shown. Connect WHITE wire from remote receiver to WHITE wire from light fixture. Connect
BLUE wire from Remote receiver to BLACK (or BLUE) wire from light fixture. Be sure plugs connections snap together
completely. (Fig. 5)
Note: Make sure the light kit is set at ON position by pull chain switch originally supplied with your light kit.
Note: Electrical rating for fan motor is 1.5 A max and 300 W max for light.
Fig. 4
Fig. 4-1 Fig. 4-2
Switch housing
Set screws
Switch housing
Set screws
Receiver
Receiver
Receiver
Double-sided foam tap
Light fixture
Switch housing
Lead wires
Lock washer
Hex nut
Fig. 5
Tap
Tap
Capacitor
Capacitor