
Installation Guide

7
© 2013 Monte Carlo Fan Company
9/25/2013
Tips for end users
1. If your fan is operated automatically after installation and power on, it is because your fan is still memorize the previous
setting at factory. Make learn function setting and your fan will be ready for use.
2. If fan or light isn’t working, reset power (turn the power off for at least 5 seconds and then turn the power back) and redo the
learn function setting.
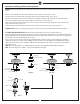
3. It is not available to separately operate the remote setting for more than one fan in the same room (in the area where remote
signal can reach to) if they share the same power supply. Separate power supplies (like as using individual wall switches for each
fan) is required if you want to separately control more than one fan in same room.
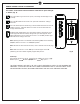
4. There might be other remote transmitters got the same code combination as the transmitter that you are using, you may
remove the code setting of the other transmitters by turn the power off and turn it back and then push and hold the “OFF” button
of the transmitter which you are using for at least 10 seconds. You must press the ‘OFF” button within 60 seconds of restoring
power to the fan.
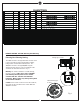
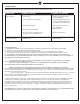
REMOTE CONTROL SETTING and OPERATION
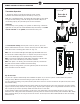
2. Learn function setting, Restore power source to your fan, press and
hold the “OFF” button for at least 4 seconds. You must press the ‘OFF” button
within 60 seconds of restoring power to the fan. (Fig. 8-1)
Note: If the fan is installed with light (down light), light will twinkle twice then
off. The remote control setting process is complete and your fan is ready for
use. For fans without light, check operation using remote transmitter.
Note: If you want to control the fan with another transmitter, make the same
setting. A fan can be controlled by 2 transmitters maximum.
Note: If the power is on already, you must turn the power off, and then turn
the power back for remote control learn function setting.
Note: If you press wrong buttons, you must again turn power off and turn the
power back then reset learn function.
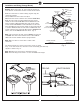
Transmitter Operation
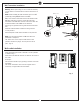
1. Remove the battery seat from the bottom of remote control
transmitter and install battery. Replace the battery seat. (Fig. 8)
Note
: Use a 3V CR2032 battery. The battery will weaken with age and should
be replaced before leaking as this will damage the transmitter. Dispose of
used battery properly, keep the battery out of reach for children.
Useful tips
Remove battery seat by pushing at “A” position as shown in Fig. 8 toward to
right hand side and pull it out. Install CR2032 battery into battery seat (make
sure the side with “+” is upward) and reinstall the battery seat.
Back side of
transmitter
A
Fig. 8
Fig. 8-1
“OFF”