
Use and Care Manual

WWW.RSIWW.COM
29 of 43
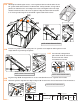
NOTE: VIEW FROM OUTSIDE.
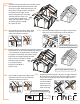
NOTE: VIEW FROM OUTSIDE.
NOTE: Panels will not fit completely to end of channels.
There will be some space to allow for temperature changes.
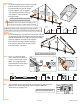
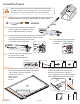
Continue working from outside to install
panels a shown. Remove plastic film
from both sides of two W-3 and
two W-4 panels. Fit each panel
into channel in profiles, placing
side marked “ UV Resistant”
facing outside.
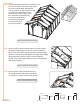
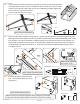
From outside fit F-7 profiles into each side of back.
Arrange the profile so channel lines up with tops of
panels. Begin with either right or left side. Profile
side fits against cut angle of F-8 profile.
One end touches top of gutter and top
end touches edge of F-2 center profile.
Position both F-7 profiles.
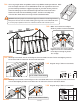
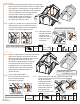
Use C-1 connector with
three T-bolt assemblies to
secure each outside corner.
Make sure all profiles line
up flush against each other.
Repeat on other side.
Check inside corners to ensure B-7 connector is still in correct
position. If it needs adjusting, repeat steps 6.5B until
each corner is properly set.
6.4
6.5A
6.5B
6.6
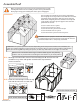
NOTE: VIEW FROM INSIDE.
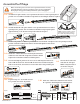
WARNING: The corners of W-3 and W-4 panels
are sharp. Use extreme caution when handling.
W-3
W-3
W-4
W-4
W-4 2
Panel
QTY
24” x 30 ¾”
W-3 2
Panel
QTY
24” x 15 ¼”
F-8
F-7
F-7
F-8
F-2
S-2C 6
Connector
QTY
C-1 2
Connector
QTY
S-7 4
QTY
Prole
F-7
56”
2
G-1
F-6
B-7
F-7
G-1
C-1
F-7
F-7
F-6