
Use and Care Manual

WWW.RSIWW.COM
40 of 43
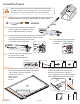
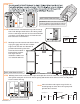
W-6 2
Panel
QTY
24” x 34”
D-9
S-9 4
2
Connector
QTY
QTY
Prole
68½”
E-2 1
E-1 2
24”
E-3 1
22¼”
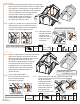
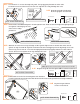
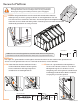
IMPORTANT: You are assembling a right and left door. Facing the front of the greenhouse
from the outside with the doors closed, the left door is on the left side of the greenhouse
and the right is on the right side. The left door closes over the right and locks at the top.
Assemble and Install Doors
Make certain the pieces are in the correct positions before securing.
Carefully follow the order of assembly to ensure an easy installation.
Wear proper safety gear including work shoes, gloves and goggles.
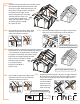
Begin right door assembly. Prepare one E-2 door profile. Position with
holes facing up. Slide one D-9 corner connector into each end.
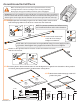
Slide E-1 door profiles into D-9 corner connectors and secure each
with one S-9 screw.
Remove plastic film from both sides of two W-6 panels. Fit panels into channels in door profiles
as shown, placing side marked “ UV Resistant” facing down.
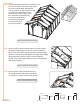
With slotted side facing up, slide E-3
profile into place.
Secure each corner with
one S-9 screw using a
Phillips screwdriver.
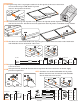
10.1A
10.1c
10.1D
10.1e
10.1B
NOTE: D-9 corner connectors are hollow on one
end. Install with hollow end in either direction.
NOTE: Holes in D-9 connectors are not predrilled. Using S-9 screw, apply pressure
to puncture. Hand tighten using supplied screwdriver. Do not over tighten.
E-2
E-2
D-9
S-9
S-9
E-1
D-9
E-1
E-1
W-6
W-6
E-3