MONTICELLO GREENHOUSE Interior Shade Cloth System INSTALLATION MANUAL Riverstone Industries Corporation www.RSIWW.com Customerservice@RSIWW.
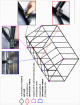
All views and work are done inside of the greenhouse PARTS SHOWN IN SILVER ARE USED ONLY TO CONTRAST FROM THE BLACK FINISH OF THE GREENHOUSE IN THIS MANUAL. STEP 1: Start by attaching one end of the cable to the bracket labeled B‐3. Slide the cable clamp onto the cable approximately 2'' photo 1, do not tighten clamp. Next, slide the bracket onto the cable approximately 1‐1/2'' and fold cable photo 2. Take folded end of cable and insert into the cable clamp photo 3.
8 STEP: 4 At the front wall (above the door). Unscrew the nut from the set screw assembly at the bottom of the Corner/Ridge bracket B‐7 as you did in Step 2. Place the bracket labeled B‐3 onto the set screw and tighten. photo 8 STEP: 5 Run the cable through the brackets that you have placed. photo 9 9 At the front wall, slide the cable clamp onto the cable leaving the clamp loose photo 10. 10 Next, insert the cable through the bracket, pull tightly and secure with cable clamp photo 11 & 12.
13 1st shade panel PLACE BUNGEE BALL IN CORNERS STEP: 6 Place bungee balls at each corner of the greenhouse photo 13 & 13a. You may (depending how tight you want the shade fabric) need to tie a knot in the bungee balls to get the desired tension photo 13a. Drape the shade fabric over the cable photo 13 and attach shade at the corners using bungee balls photo 14. CORNER BRACKET B‐7 BUNGEE BALL attaching shade to bungee ball 13a STEP: 7 Place bungee balls as shown in photo 15 & 15a.