
Use and Care Manual


WWW.RSIWW.COM
30 of 45
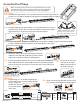
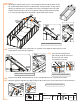
S-7
S-5A 4
18
B-54
B-10 8
S-2C
16
QTY
Profile
49¾”
48½”
R-1E
3
R-1
2
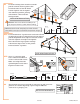
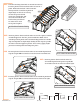
Assemble Roof Ridge
Make certain the pieces are in the correct positions before securing.
Carefully follow the order of assembly to ensure an easy installation.
Wear proper safety gear including work shoes, gloves and goggles.
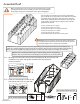
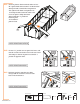
Install B-10 splice with C-curve positioned next to center opening in R-1
profile. Use screwdriver handle to tap until friction dimple holds it in place.
Install another B-10 splice with C-curve positioned next to center
opening in R-1 profile. Use screwdriver handle to tap to push splice
approximately 1/4” farther into profile than first splice.
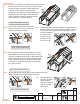
Loosen and adjust position of set screws and long hex bolt to fit
holes in B-5 connector. Position B-5 connector with the long hex
bolt in center hole, and center to the seam where the profiles join.
Repeat step 7.1 to install remaining two
R-1E profiles next to R-1E profile. Repeat
step 7.1 again to
install the second
R-1 profile on the
other side.
Slide one T-bolt into channel in each end of
R-1 profiles. Hand tighten to hold in place.
Secure B-5 connector
with four S-2C caps.
NOTE: Long hex bolt is
secured in step 8.
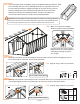
7.1A
7.1B
7.1e
7.2A
7.2B
7.1f
NOTE: Position each B-10 splice
with C-curve next to center in
R-1 and R-1E prole openings.
R-1
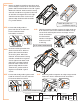
Slide four T-bolts and one S-5A long hex bolt into
channel in one end of R-1E profile as shown. Hand
tighten first and last T-bolts to hold in place.
7.1D
R-1E
Slide R-1E profile toward R-1 profile. Make sure both B-10 splices fit into openings in R-1E
profile. Continue sliding until seams are butted against each other.
7.1c
R-1
R-1E
R-1
R-1E
B-5
R-1
R-1