
Use and Care Manual


WWW.RSIWW.COM
32 of 45
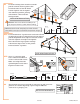
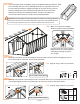
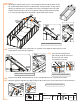
Assemble Roof
Make certain the pieces are in the correct positions before securing.
Carefully follow the order of assembly to ensure an easy installation.
Wear proper safety gear including work shoes, gloves and goggles.
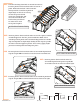
NOTE: VIEW FROM OUTSIDE.
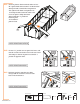
NOTE: Use the included five foot bungee cords for added support. They will help
hold the sides in position while assembling the roof. Remove as you install profiles.
IMPORTANT: The panels expand and contract depending on the temperature. Under some conditions, the
panels may require slight force to install. Do not use excessive force or you may move profiles out of position.
When you are having difficulty sliding the panels, use dish soap with water on the edges as a lubricant.
WARNING: Use two people to install roof. Allow enough time
to complete this step and install and secure roof. Do not leave
roof unattended until it is completely assembled.
The roof panels are installed in the sections shown below.
Use two people and a step ladder to assemble the roof. Place
step ladder inside greenhouse. Have one person stand on
ladder inside and guide panel into channels in roof ridge and
corner profiles. The other person supports the end of the
panel from the outside.
Section 1: Back two W-1 panels
Section 2: Front two W-1 panels
Section 3: Next three W-1 panels from back
Section 4: Next three W-1 panels
Section 5: Next five W-1 panels
Section 6: Final W-1 panel and four W-2 panels
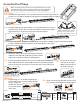
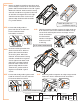
Working from the inside, Insert T-bolt assembly into B-4 connector and
install on every other side profile on both sides of greenhouse.
Secure as shown.
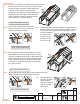
Hook one end of bungee cord into top
hole in B-4 connector on each side.
8.2A
8.2B
NOTE: VIEWS FROM INSIDE.
NOTE: VIEWS FROM INSIDE.
5
5
5
5
5
6
6
6
6
6
2
2
1
1
3
3
3
4
4
4
B-4
F-1
bungee cord
bungee cord
bungee cord
bungee cord
B-4
S-2C 8
8
Connector
QTY
4
QTY
5’ Bungee Cord
Connector QTY
S-7 8