
Use and Care Manual


WWW.RSIWW.COM
2 of 45
Introduction
Thank you for purchasing the Mojave Edition Monticello
TM
Greenhouse. The Monticello line is proudly made in the
USA by a leading commercial greenhouse maker using the same professional grade materials and design. The frame
is constructed with the highest quality extruded aluminum with lead free powder-coated paint. The panels are
professional grade 8mm twin wall polycarbonate selected for their insulation and durability.
The List of Parts has the corresponding step number referenced to each part so you can easily prepare for each
step. We recommend placing all parts in one staging area. Lay out parts by size and shape. Use the List of Parts
to identify the part numbers for profiles and panels. We have not labeled the parts with stickers to avoid removing
them during assembly.
Our greenhouse has been designed to be easily assembled. Although all but one step can be completed by one
person, we recommend using a helper for the entire assembly. You will need assistance from another person to
assemble the roof. If you have never assembled a greenhouse before, make it a weekend project. We recommend you
take your time and read these instructions carefully to avoid mistakes.
NOTE: These instructions include helpful hints and important information needed to safely assemble and properly
maintain the greenhouse. Please read these instructions completely before you begin.
CAREFULLY READ ALL INSTRUCTIONS BEFORE YOU BEGIN.
FOLLOW STEPS IN THE ORDER PRESENTED. KEEP THIS MANUAL FOR FUTURE REFERENCE.
Before Starting Assembly:
1. Make sure you have all the necessary parts:
Compare the contents of the cartons with the List of Parts. If any parts are missing or damaged, contact
Riverstone Customer Service before beginning assembly. During business hours call (877) 373-3078,
email: customerservice@rsiww.com or use the After Hours Helpline: (443) 574-4764.
2. Lay the parts out in one staging area:
The List of Parts has the corresponding step number referenced to each part so you can easily prepare for
each step. We recommend placing all parts in one staging area. Lay out parts by size and shape. Use the List
of Parts to identify the part numbers for proles and panels. We have not labeled the parts with stickers to
avoid removing them during assembly.
3. Select a Location:
When selecting a site for your greenhouse, a at level surface is essential and if possible, with proper water
drainage and easy access to power and water necessary for greenhouse gardening. Choose a sunny, level
position away from overhanging trees and power lines and protected from the wind as much as possible.
The location should be away from structures that could cause snow to drift on or around the greenhouse.
Locate underground pipes or cables before preparing the site or anchoring the greenhouse.
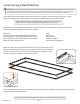
4. Prepare a Foundation:
After choosing a location, proper preparation of the site is essential. The site must be level. The greenhouse
must be mounted to a base. Construct the base rst so the greenhouse can be securely mounted.
We recommend constructing a wood platform base using a perimeter of two by fours lled with either soil,
sod or gravel. Instructions for constructing a wood platform can be found in this manual.
Other suitable base options include wood decks and concrete slabs. Wood screws are included to secure the
greenhouse to a wood base. The greenhouse is secured to the ground from the inside with ground anchors.
See step11 for details. If you are using a concrete base, get appropriate mounting screws before beginning.
Make sure the corners are square by measuring the inside diagonals from both sides and making sure they
are equal. Use a spirit level to make sure the base is level.
Contact your local authorities regarding any required building permits or restrictions.
Please send us photos of your new greenhouse to post on the Riverstone website.
Contact us with questions at Customer Service: (877) 373-3078
Email: customerservice@rsiww.com After Hours Helpline: (443) 574-4764