
Use and Care Manual


B-8
B-8
B-8
B-8
B-5
B-5
B-5
B-5
B-5
B-5
B-5
B-5
B-5
B-5
B-5
B-5
FRONT
BACK
WWW.RSIWW.COM
11 of 51
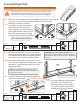
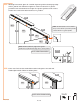
Make certain side profiles are straight and flush. Adjust position of T-bolts in
inner bolt track at front of profile to fit holes in B-5 connector. Center connector
over seam for maximum hold. Secure using four S-2C caps. Repeat on outer bolt
track to install eleven remaining B-5 connectors at back and sides.
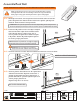
Make certain corners line up
and are flush. Adjust position of T-bolts
in inner bolt track to fit holes in B-8
connector. Secure with four S-2C caps.
Repeat until each corner is secure.
1.3A
1.3B
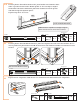
Measure base diagonally from inside corner.
Equal measurements ensure the base is
square. Use a spirit level to make sure the
base is level.
1.4A
Locate predrilled holes in base profiles.
Use six S-4 screws, one at each corner
and one in the center of each side to secure
to wood platform. You will secure the
greenhouse completely to the platform
in step 11.1 when assembly is finished.
1.4B
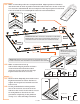
IMPORTANT: One B-5 connector is installed on inside front.
Remaining B-5 connectors are installed on outside back
and sides. B-8 corner connectors are installed on inside.
NOTE: Connector size is
not shown proportionally
in this drawing.
IMPORTANT: Double check the position and amount of unused
T-bolts in the base. You should have 53 available for later assembly.
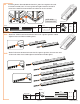
B-5
B-8
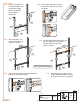
S-2C 16
Connector
QTY
B-8 4
S-2C 40
Connector
QTY
B-5 10
S-4
B-8
S-4
6
Connector
QTY