
Use and Care Manual


WWW.RSIWW.COM
36 of 51
W-8 3
Panel
QTY
24” x 57”
B-4
S-5B 1
S-2C 9
4
Connector
QTY
Connector QTY
S-7 8
*
NOTE: W-10 panels are
installed in step 8.8
8.4A
8.4D
W-8
W-8
W-8
8.4c
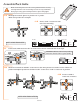
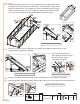
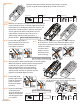
Hold two profiles together in place at ridge using one
B-4 connector. Insert two T-bolt assemblies, line up
center hole with long hex bolt in roof ridge. Secure
T-bolt assemblies
as shown.Place
washer on long bolt
and secure with
S-2C cap.
F-1
F-1
R-1
B-4
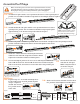
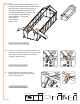
Return to back to install section three and
remove bungee cord nearest to back. Remove
plastic film from both sides of one W-8 panel.
With side marked “ UV Resistant” facing
outside, install the next panel on the left
at the back. Push panel into roof ridge
channel until the other end rests on
gutter ledge and then slide towards
F-1 profile at back.
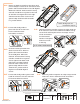
Continue working from back to
finish section three. Remove
plastic film from both sides
of one W-8 panel. With side
marked “ UV Resistant” facing
outside, install the next panel
on the right at the back. Push
panel into roof ridge channel
until the other end rests on
gutter ledge and then slide
towards F-1 profile at back.
Repeat to install W-8 panel
on left.
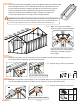
NOTE: VIEWS FROM INSIDE.
From inside, hold profile in
place with one B-4 connector.
Secure with two T-bolt
assemblies as shown.
8.4B
F-1
B-4
F-1
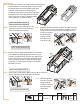
From inside, hold profile in place with
one B-4 connector. Secure with two
T-bolt assemblies as shown.
8.4e
F-1
B-4
F-1
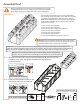
NOTE: VIEWS FROM INSIDE.
Hold two profiles together at ridge using one B-4
connector. Secure with two T-bolt assembies.
8.4F
R-1
F-1
F-1
B-4