
Installation guide


Page 5
Part No. XG0509
DFSP Rio Pedestal Stove
Quality Gas Products by Montigo
Installation
Direct Vent
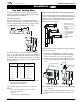
Installing Terminations with Built-In Frames
1. Frame the termination opening to 10" x 10".
2. Fasten the termination to the studs using a minimum of 4
Installing Rio 'Snorkel' Terminations
See Rear Vent Venting Runs section for Snorkel Installations.
1. Ensure that the two long mounting brackets are facing the bot-
tom of the termination. (See inset). This will provide more heat
protection at the top of the termination, where temperatures are
highest.
2. Attach to the faceplate of the termination using four sheet metal
screws.
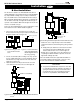
Installing Heat Guards over Terminations
MTKOG
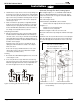
Rear Vent Venting Runs
The Rio Pedestal Stove may be vented directly out the back through
an exterior wall. This application allows the stove to be installed with
no visible venting in the room. You must use the Direct Vent - Rear
Vent Kit (Part # FSTK01) for this installation.
Rear Vent Installation Requirements.
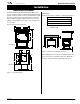
The height from the hearth to the center of the vent pipe is 25".
The maximum horizontal run for a Rear Vent installation is 14".
The FST-11 (18" length section is supplied for connecting the
stove to the termination. The FST-11 may be cut to required
length, and must not exceed 14".
The two wall plates and the cover plate included with this kit must
be installed for proper operation.
Figure 6. Rear Vent installation, showing the required components
and the height of the stove's flue collar.
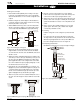
Installation.
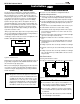
1. Mark an 11" x 11" hole centred exactly 25" from the centre of the
stove's flue collar to the hearth (- the surface the stove will be sit-
ting directly on). This hole will be cut right through to the exterior
of the building for the vent pipe to pass through. Precise location
of this hole is very important: check your measurements before
cutting!
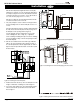
2. Connect the FST11 to the back of the stove, but do not fasten it.
Slide the cover plate and the inner wall plate onto the FST11, with
their open edges down.
Place the stove on its hearth, and slide it back until the FST11
pipe protrudes through the hole in the wall and the stove is in the
desired position. (See figure 7).
Figure 7. Installiing the inner wall plate and cover plate.
MTO-3
10
10
25"