
Installation guide

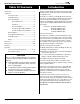

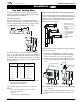

Page 6
Part No. XG0509
DFSP Rio Pedestal Stove
Quality Gas Products by Montigo
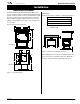
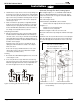
Slide the inner wall plate back against the wall. Level the plate,
making sure it completely covers the opening in the wall, and fas-
ten it in place using four wood screws. (Note that the heat shield
connected to the plate is not concentric -- its top edge should sit
close to the inside top edge of the 11" x 11" hole.)
Slide the Cover Plate onto the inner wall plate and fasten it with
one black sheet metal screw on each side.
3. The (outer) wall plate is used to mount the snorkel-type termina-
tion to the building exterior. Position the wall plate over the 11 " x
11" hole.
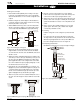
Push the heat shield portion into the opening so that it mates with
the heat shield on the inner wall plate. This will properly position
the wall plate over the opening.
(Refer to figure 8).
Level the wall plate. It may be installed either over top of the
exterior cladding (brick, stucco, siding, etc.), or against the
exterior sheathing. If installing it directly on the exterior sheathing,
you must cut away the siding or other fascia by tracing an outline
around the wall plate.
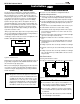
4. Slide the stove forward and remove the FST11 pipe. Attach the
FST11 to the snorkel termination, and mount the assembly on
the outer wall plate between the two alignment tabs as shown in
figure 9. Fasten it in place with at least two screws at the top and
two at the bottom.
Figure 8. Installing the outer wall plate.
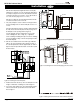
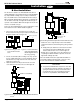
5. Install the rain shield onto the top of the outer wall plate as shown
in figure 10. Run beads of caulking, also shown in figure 10.
6. If necessary, cut the FST11 pipe to the required length, and then
slide the stove back into position and connect it to the FST11.
Refer to figure 11.
Figure 9. Attaching the snorkel termination to the outer wall plate.
Figure 11. Mating the stove to the FST11 and snorkel termination.
Snorkel
FST11
Figure 10. Installing the rain shield and applying silicone sealant.
Caulk here
Caulk here
(both sides)
Rain shield
Installation
Direct Vent