
Installation guide


Page 9
Part No. XG0509
DFSP Rio Pedestal Stove
Quality Gas Products by Montigo
Direct Vent
Installation
8. Move the stove into position below the stove pipe. Slide the
bottom section of stove pipe down over the collar on the top vent
conversion box. Install a spacer spring inside this section.
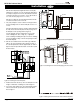
9. Slide the last section of stove pipe down over the bottom pipe. Ad-
just the position of the stove pipes so thethat joints are all equally
spaced. Ensure that there is at least 1 1/2" overlap between each
section.
10. Secure each stove pipe joint with at least three ½" hex screws
spaced approx. 3/4" from the joint (so that the brass ring will
cover both the joint and the screws).
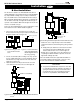
11. Finishing
Install the ceiling collar over the ceiling box to provide a finished
look.
Cover each joint in the stove pipes with a brass decorator ring.
The rings should cover the joint as well as the sheet metal screws.
Attach the ring using the black 3/8" screws provided. Make sure
the screw is facing the back of the stove. See Figure 15.
12. Completing the Vent Run
Run additional components as necessary to bring the venting up
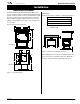
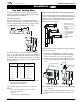
Figure 18. Installing spacer springs. Installing the slip section.
Installing the Stove Pipe
1. Ensure that the intended pathway for the venting is clear.Try to
position the stove midway between two joists to avoid having to
cut them. Cut and frame a 11" x 11" hole in the ceiling and roof as
required.
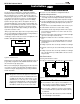
2. Install the ceiling box as shown in Figure 17. Ensure that there
is at least 2" clearance from the bottom of the box to the ceiling.
Fasten in place with 2 screws per side.
3. Slide the MEXT-2 down into position so the male end protrudes
into the room below the ceiling box as shown in Figure 17 and
secure it temporarily with an MSPXT-7 support plate and ring.
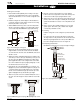
11”
Ceiling box
MEXT-2
in position
11”
support ring
support plate
ceiling plate
COLL011
Figure 17. Installing the ceiling box.
4. Measure the flex pipe (Part # FST08) and cut it to the required
length. Install the second collar onto the end of the flex. Attach
one end of the flex to the inner collar of the MEXT-2, and secure it
with three screws.
5. Slide the decorative ceiling plate about two inches down from the
end of the top section of stove pipe. Install the top stove pipe onto
the outer collar of the MEXT-2. Now slide the decorativeceiling
plate up against the bottom of the ceiling box and secure it with
four screws. Install the first spacer spring by sliding it up over the
flex and into the bottom of the stove pipe.
6. Now slide the slip section (Part # FST05) up over the flex, over
-
lapping the top section at least half its length to keep the pipe out
of your way. Install a spacer spring inside the slip section. Slide
the last section of standard stove pipe up inside the slip section,
again overlapping the two by at least half a pipe length.
7. Attach the top vent conversion box (Part # FST04) to the stove's
flue collar as shown in Figure 18. Secure it with four sheet metal
screws.
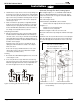
Figure 19. Positioning and fastening the stove pipes.
Slide slip
section down
Ensure all
3 sections are
evenly spaced.
Direct Vent